Σάββατο 9 Νοεμβρίου 2019

Κορμός μωσαϊκό MINNIE MOUSE με ροζ κομματάκια σοκολάτας και γέμιση πραλίνας μπουένο-MINNIE MOUSE trunk (kormos-mosaic) with pink chocolate chips and praline bueno stuffing!!!

(In English see below),
Την συνταγή την εμπνεύστηκα για τα γενέθλια της ανιψιάς, μου και της την αφιερώνω με όλη μου την αγάπη!!! 
Θα χρειαστούμε:

Για έναν μέτριο προς μεγάλο κορμό μωσαϊκό

  • 1 και 1/2 συσκευασία μπισκότα πτι μπερ,
  • 200 γρ. μαργαρίνη,
  • 3 κουταλιές σούπας κακάο,
  • 2/3 φλυτζάνας τσαγιού άχνη ζάχαρη,
  • 1 φλυτζάνα τσαγιού γάλα συμπυκνωμένο (όπως είναι από το κουτί),
  • 3 συσκευασίες rubby kit-kat (τα ροζ),
  • 3 κουταλιές σούπας πραλίνα bueno.
Για την διακόσμηση
  • Μία συσκευασία κόκκινης ζαχαρόπαστας (όπως πωλείται έτοιμη),
  • Μία κουβερτούρα υγείας.
Εκτέλεση:
Θα χρειαστούμε στη φάση αυτή την πρώτη συσκευασία των μπισκότων πτι μπερ. Τα κόβουμε σε επιφάνεια κοπής με μεγάλο μαχαίρι σε κατά το δυνατόν ομοιόμορφα και όχι πολύ μεγάλα κομμάτια.
Λιώνουμε τα 200 γρ. μαργαρίνη και τα τοποθετούμε σε ένα μεγάλο μπολ.
Προσθέτουμε το κακάο, την άχνη ζάχαρη και το συμπυκνωμένο γάλα.
Ανακατεύουμε πολύ καλά το μείγμα με σύρμα (αβγοδάρτη).
Εφόσον όλα τα υλικά έχουν αναμειχθεί καλά, προσθέτουμε τα σπασμένα πτι μπερ και ανακατεύουμε καλά ώστε να βραχούν και το μείγμα να σφίξει.
Το αφήνουμε στην άκρη όση ώρα θα κόψουμε τα rubby kit-kat σε ομοιόμορφα μικρά κομματάκια (πάλι με το μεγάλο μαχαίρι μας προσεκτικά, σε επιφάνεια κοπής).
Τα προσθέτουμε στο μείγμα μας και ανακατεύουμε καλά.
Απλώνουμε σε μεγάλη ίσια επιφάνεια μια λαδόκολλα και απλώνουμε το μείγμα σε ένα μεγάλο ορθογώνιο σχήμα και σχετικά λεπτό σε πάχος.

Για την εσωτερική γέμιση, θα χρειαστεί σε multi μπλέντερ να θρυμματίσουμε τη μισή συσκευασία από τα μπισκότα πτι μπερ, η οποία μας έχει απομείνει.
Αναμιγνύουμε με τις τρεις κουταλιές σούπας πραλίνας bueno ώσπου να γίνει μια ομοιογενής πάστα.
Πλάθουμε ένα μακρόστενο "μπαστούνι" και το τοποθετούμε κατά μήκος και στη μέση του προηγούμενου μείγματος μας, το οποίο απλώσαμε στην λαδόκολλα.

Τυλίγουμε και κλείνουμε τον κορμό μας με τρόπο που η πραλίνα bueno να μείνει στο κέντρο, τυλίγουμε καλά με τη λαδόκολλα και τοποθετούμε στην κατάψυξη.

Για να διακοσμήσουμε τον κορμό μας θα φτιάξουμε κόκκινα τρισδιάστατα φιογκάκια με την χρήση της ζαχαρόπαστάς μας, και στρόγγυλα αυτάκια με τη χρήση της κουβερτούρας μας.

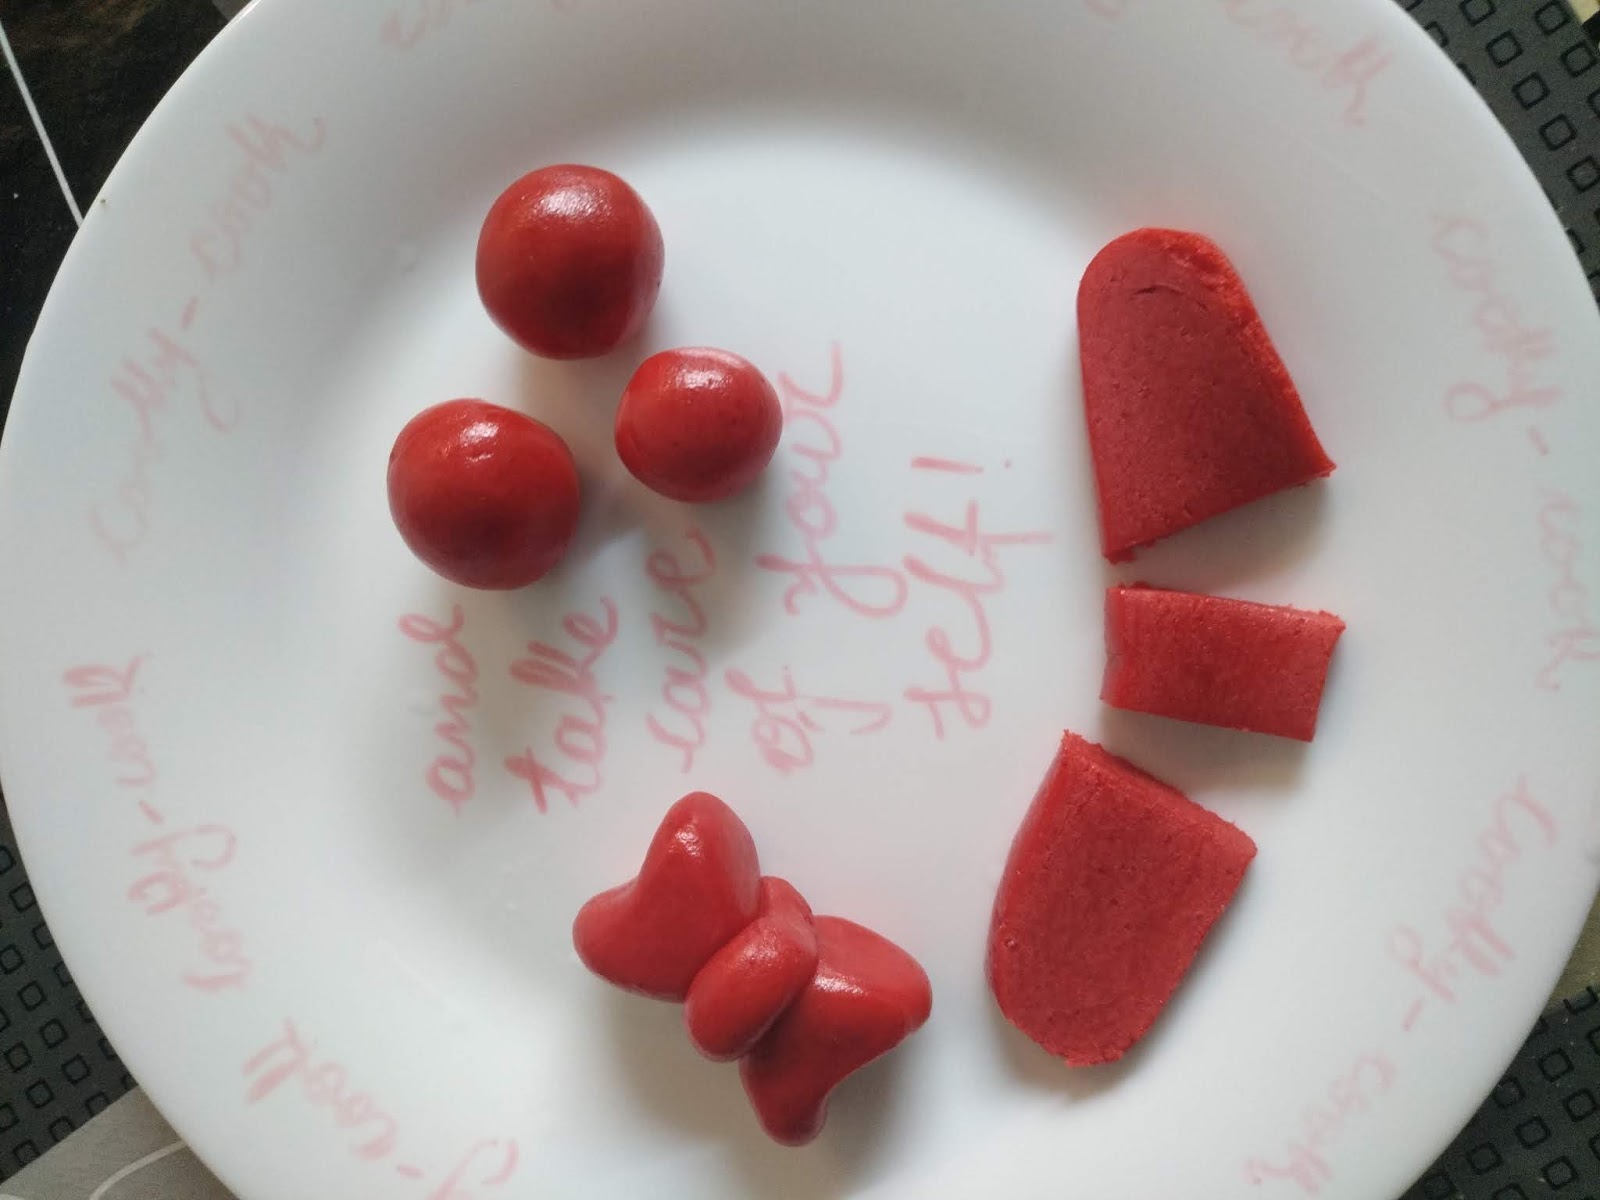
 Ξεκινώντας με τα φιογκάκια μας, κόβουμε τη ζαχαρόπαστα κατά πλάτος σε 17 μακρόστενες λωρίδες. Την κάθε μία την κόβουμε σε δύο μεγαλύτερα κι ένα μικρότερο μέρος. Πλάθουμε τρεις μπαλίτσες. Στις δυο μεγαλύτερες δίνουμε σχήμα καρδιάς, την μικρότερη την πατάμε ελαφρώς στο κέντρο για να γίνει πεπλατυσμένη. 
Ενώνουμε τα τρία τμήματα με τρόπο ώστε η μικρή πεπλατυσμένη μπίλια να είναι στο κέντρο και οι δυο καρδούλες δεξιά κι αριστερά. Με τον τρόπο αυτό δημιουργείται ένα φιογκάκι. Δημιουργούμε 17 και τα τοποθετούμε σε ένα πιάτο στο ψυγείο, χωρίς να ακουμπάνε το ένα το άλλο.

Συνεχίζουμε με τα αυτάκια. Σε μπεν μαρί λιώνουμε την κουβερτούρα μας και την απλώνουμε σε λαδόκολλα ομοιόμορφα και σε σχετικά λεπτό στρώμα. Αφήνουμε να κρυώσει και να στερεοποιηθεί σχετικά και με ένα καπάκι από μπουκάλι νερού , το οποίο χρησιμοποιούμε ως κουπ-πατ, κόβουμε 34 κυκλάκια στην επιφάνεια. Τοποθετούμε για πέντε λεπτά στο ψυγείο κι έπειτα με μεγαλύτερη πλέον ευκολία διαχωρίζουμε και ξεκολλάμε τα σοκολατένια κυκλάκια μας. Τα τοποθετούμε σε ένα πιάτο στο ψυγείο, χωρίς να ακουμπάνε το ένα το άλλο.

Την επόμενη μέρα κι όταν ο κορμός έχει παγώσει καλά, τον κόβουμε σε 17 ομοιόμορφες φέτες και στολίζουμε τοποθετώντας από ένα κόκκινο φιογκάκι στην κορυφή και στο κέντρο της καθεμιάς, κι από δυο στρόγγυλα αυτάκια δεξιά κι αριστερά τα οποία στηρίζουμε ανάμεσα σε δυο φέτες. 
Στολίζουμε με τον ίδιο τρόπο κατά μήκος όλες τις φέτες και ο κορμός μας Minnie Mouse είναι έτοιμος!!!


Προσαρμόστε ανάλογα το σχέδιο για διαφορετικές θεματικές!!!

-------------------------------------------------------------------------------------------------------------------
I was inspired the recipe for my niece's birthday, and I dedicate it to her with all my love!!!

We will need:

For a medium to large trunk ( kormos-mosaic in greek)

1 and 1/2 pack of biscuits type petit - beurre,
200 g margarine,
3 tablespoons cocoa,
2/3 teaspoon powdered sugar,
1 teaspoon concentrated milk (as in the box),
3 packs of rubby kit-kat (pink),
3 tablespoons of praline bueno.

For decoration
One packet of red pastry,
Chocolate couverture.

Implementation:

In this phase we will need the first package of biscuits. Cut them on a cutting surface with a large knife in as uniform as possible and not too large pieces.

Melt 200 g. margarine and place in a large bowl.

Add the cocoa, powdered sugar and concentrated milk.

Mix thoroughly with wire whisk.

Once all the ingredients have blended well, add the broken biscuits and mix well.

Leave it aside for as long as we cut the rubby kit-kat into evenly small pieces (again with our large knife carefully, on a cutting surface).

Add them to our mixture and mix well.

Spread graseproof paper on a large straight surface and spread the mixture into a large rectangular shape in a relatively thin layer.

In the next phase, for the internal filling, we will need to crumble half of the leftover biscuits in a multi - blender.

Mix with the three tablespoons of bueno praline soup until it becomes a homogeneous paste.

Place it along the middle of the previous mixture.

Wrap and close the trunk so that the bueno praline stays in the center, wrap well with the graseproof paper and place in the freezer.

To decorate our trunk we will make red coloured, three-dimensional bows with the use of our pastry, and minnie ears with our chocolate couverture.

Starting with our bows, we cut the red pastry across into 17 long strips. Cut each one into two larger portions and one smaller. In the two bigger ones we give the shape of a heart, the smaller one , we slightly press in the center so that it becomes flattened.

We unite the three sections so that the small flattened ball is in the center and the two hearts are right and left. This creates a bow. We create 17 and place them on a plate in the fridge, without touching each other.

We continue with the minnie mouse ears. In a bain-marie we melt our chocolate couverture and spread it evenly on a graseproof paper and in a relatively thin layer. Leave it to cool and solidify and with a water bottle lid, which we use as a cuter, we cut 34 circles on the surface. Put in the refrigerator for five minutes and then more easily separate and peel off our chocolate chips. Place them on a plate in the fridge, without touching each other.

The next day and when the trunk is well frozen, we cut it into 17 even slices and decorate each slice by placing a red bow at the top and center of each, and two round chocolate couverture chips right and left which we support between two slices.

We decorate in the same way along all the slices and our Minnie Mouse trunk is ready !!!

Customize the design accordingly for different themes !!!

----------------------------------------------------------------------------------------------------------------------
TRANSFORM IN BRAILLE
Text of the recipie to transform in Braille (Choose either Czech1-English (UK)1 - English (US)1 - French Grade1and Unified Braille Code 1) via https://www.brailletranslator.org/  download it in .brf ASCII file and be able to print it in a suitable printer:

cookycook
minnie mouse trunk kormos greek sweet with pink chocolate chips and praline bueno stuffing
one and half pack of biscuits type petit beurre
two hundred gr margarine
three tablespoons cocoa
half glass of powdered sugar
one glass of concentrated milk
three packs of rubby kit kat
three tablespoons of praline bueno
for decoration
one packet of red pastry
chocolate couverture

implementation
in this phase we will need the first package of biscuits
cut them on a cutting surface with a large knife in as uniform as possible and not too large pieces
melt two hundred gr margarine and place in a large bowl
add the cocoa powdered sugar and concentrated milk
mix thoroughly with wire whisk
once all the ingredients have blended well add the broken biscuits and mix well
leave it aside for as long as we cut the rubby kit kat into evenly small pieces again with our large knife carefully on a cutting surface
add them to our mixture and mix well
spread graseproof paper on a large straight surface and spread the mixture into a large rectangular shape in a relatively thin layer
in the next phase for the internal filling we will need to crumble half of the leftover biscuits in a multi blender
mix with the three tablespoons of bueno praline soup until it becomes a homogeneous paste
place it along the middle of the previous mixture
wrap and close the trunk so that the bueno praline stays in the center wrap well with the graseproof paper and place in the freezer

to decorate our trunk we will make red coloured three dimensional bows with the use of our pastry and minnie ears with our chocolate couverture
starting with our bows, we cut the red pastry across into seventeen long strips
cut each one into two larger portions and one smaller
in the two bigger ones we give the shape of a heart the smaller one we slightly press in the center so that it becomes flattened.
we unite the three sections so that the small flattened ball is in the center and the two hearts are right and left
this creates a bow
we create seventeen and place them on a plate in the fridge without touching each other
we continue with the minnie mouse ears
in a bain marie we melt our chocolate couverture and spread it evenly on a graseproof paper and in a relatively thin layer
leave it to cool and solidify and with a water bottle lid which we use as a cuter we cut thirtyfour circles on the surface

put in the refrigerator for five minutes and then more easily separate and peel off our chocolate chips
place them on a plate in the fridge without touching each other
the next day and when the trunk is well frozen we cut it into seventeen slices and decorate each slice by placing a red bow at the top and center of each and two round chocolate couverture chips right and left which we support between two slices
we decorate in the same way along all the slices and our Minnie Mouse trunk is ready
customize the design accordingly for different themes


Παρασκευή 18 Οκτωβρίου 2019

Ανάμεικτα λαχανικά στο φούρνο με κινόα και άρωμα από Μεξικό-Mixed vegetables in the oven with quinoa and flavor of Mexico

(In English see below),
(To transform the recipie in Braille and print it in a suitable printer,select text and link down below)

Θα χρειαστούμε (για 2 άτομα):
  • 2 μελιτζάνες,
  • 2 πράσινα κολοκυθάκια,
  • 2 μεγάλα καρότα,
  • 2 πατάτες,
  • 2 κοφτές κουταλιές σούπας κινόα,
  • 2 κουταλάκια γλυκού κόκκινη σάλτσα διπλής συμπύκνωσης,
  • 2 κουταλάκια του γλυκού μείγμα καυτερών μπαχαρικών για Μεξικάνικες τορτίγιες,
  • μισό κύβο λαχανικών,
  • 2 κουταλιές σούπας ελληνικό εξαιρετικό παρθένο ελαιόλαδο.


Εκτέλεση:
Πλένουμε τις μελιτζάνες, κόβουμε το κοτσάνι τους, τις κόβουμε σε κυβάκια και τοποθετούμε σε ένα ελαφρά λαδωμένο ταψάκι ή πυρέξ σκεύος.
Πλένουμε ομοίως τα κολοκυθάκια, κόβουμε το κοτσάνι τους , τα κόβουμε σε κυβάκια και τα προσθέτουμε στο σκεύος μας.
Πλένουμε και ξεφλουδίζουμε τα καρότα, και στη συνέχεια τα κόβουμε σε στρόγγυλες φέτες, τις οποίες έπειτα κόβουμε στα τέσσερα. Τα προσθέτουμε στο σκεύος μας.
Σειρά έχουν οι πατάτες, τις οποίες πλένουμε, ξεφλουδίζουμε , κόβουμε σε κυβάκια, τις αφήνουμε για λίγη ώρα σε μια λεκάνη με νερό ώστε να φύγει ποσότητα από το άμυλο, στραγγίζουμε και τις προσθέτουμε στο σκεύος μας.
Ρίχνουμε τις δυο κοφτές κουταλιές σούπας κινόα.

Αραιώνουμε σε μισό ποτήρι ποτήρι νερό τις δυο κουταλιές κόκκινης σάλτσας διπλής συμπύκνωσης και προσθέτουμε στο σκεύος μας.
Πασπαλίζουμε με τα 2 κουταλάκια του γλυκού το μείγμα καυτερών
μπαχαρικών για μεξικάνικες τορτίγιες.
Με ένα μαχαιράκι τρίβουμε προσεκτικά τον μισό κύβο λαχανικών μας μέσα στο σκεύος.
Προσθέτουμε τις 2 κουταλιές σούπας ελληνικό εξαιρετικό παρθένο ελαιόλαδο και είτε φορώντας κατάλληλα γάντια είτε με κάποια κουτάλα, ανακατεύουμε καλά όλα τα υλικά μας ώστε να έχουμε ένα ομοιόμορφο μείγμα όλων.
Προσθέτουμε μισό ποτήρι νερό και ψήνουμε για μισή ώρα στο φούρνο στους 180οC.

Το φαγητό μας καράμπα είναι έτοιμο και μπορούμε να το απολαύσουμε!

Ιστορία της ιδέας:
Μου αρέσει ιδιαιτέρως να αγοράζω αυτά τα κιτ φαγητών από διάφορες κουζίνες του κόσμου, όπως κιτ για σούσι, κιτ για μεξικάνικα τάκος, κιτ για μεξικάνικες τορτίγιες και άλλα πολλά.
Είναι ένας εύκολος και ολοκληρωμένος τρόπος για να ετοιμάσεις μια όμορφη θεματική βραδιά. περιλαμβάνουν τα πάντα μέσα εκτός από το κρέας το οποίο προστίθεται φρέσκο!
Συνήθως, σε αυτά τα κιτ για μεξικάνικο, τα φακελάκια με το μείγμα μπαχαρικών είναι υπερμεγέθη σε σχέση με την ποσότητα φαγητού που μπορεί να ετοιμαστεί. Μάλλον είναι για ανθρώπους που το θέλουν το κάψιμο τους να το νιώσουν για τα καλά!! Εμείς δεν το αντέχουμε το πολύ καυτερό οπότε αυτό έχει ως αποτέλεσμα πάντα το μισό φακελάκι μπαχαρικών να περισσεύει!! Θα το δείτε να αναγράφεται ως seasoning mix.
Μια μέρα αποφάσισα να κάνω ανάμεικτα λαχανικά , τα οποία πάντα κάνω στο φούρνο και ποτέ δεν τηγανίζω για να είναι πιο ελαφρύ κι υγιεινό! Και το έχω καθιερώσει έτσι και μας αρέσει πολύ!
Τα κάνω απλά, με ελαιόλαδο, λίγη κόκκινη σάλτσα, λίγο κύβο λαχανικών και εξαιρετικό παρθένο ελαιόλαδο. Λιτά κι απέριττα... Αλλά αυτή τη φορά είπα να προσθέσω από αυτό το μείγμα γιατί είχα μια διαίσθηση ότι θα ταίριαζε πολύ, κι επίσης 2 κουταλιές σούπας κινόα που είναι μια υπερτροφή, πρόκειται για φυτική πρωτεΐνη και είναι καλό να την εντάσσουμε με μέτρο στη διατροφή μας.

Το αποτέλεσμα ήταν να έχει σαν αποτέλεσμα μάλλον να μην το μαγειρέψω ξανά με τον απλό και απέριττο τρόπο αλλά πλέον μόνο έτσι!!!

Ελπίζω να το απολαύσετε!

Καλή όρεξη!

---------------------------------------------------------------------------------------

We will need (for 2 persons):
  • 2 eggplants,
  • 2 green zucchini,
  • 2 large carrots,
  • 2 potatoes,
  • 2 tablespoons of quinoa,
  • 2 teaspoons of red condensed sweet sauce,
  • 2 teaspoons of spice mix for Mexican tortillas,
  • half a cube of vegetables,
  • 2 tablespoons greek extra virgin olive oil.

Implementation:

We wash the eggplants, cut the stalks, cut them into cubes and place in a lightly oiled baking dish or pyrex.

We similarly wash the zucchini, cut their stalks, cut them into cubes and add them to our pan.

We then wash and peel carrots, then cut into round slices, then cut into four. And we add them to our dish.

The potatoes come next, which we wash, peel, cut into cubes, leave them in a basin with water for a while to remove some of the starch, drain and add to our pan.

We pour the two tablespoons of quinoa.

Dilute the two tablespoons of red sauce in half a glass of water and add to our pan.

Sprinkle the 2 teaspoons of the mixture of hot spices for Mexican tortillas.

With a knife, we gently scrape half of our vegetable cube into the pan.

We add the 2 tablespoons of greek extra virgin olive oil and either by wearing gloves or with a spoon, we mix well all of our ingredients.

We add half a glass of water and bake in the oven at 180 ° C for half an hour.

Our food, caraba, is ready and we can enjoy it!

History of the idea:

I especially like to buy these kits from various kitchens around the world, such as sushi kits, Mexican taco kits, Mexican tortilla kits and much more.

It's an easy and complete way to prepare a beautiful theme night. This kits include everything except the meat that is added fresh!

Usually, in these Mexican kits, the spice mix sachets are oversized in terms of the amount of food that can be prepared. Probably for people who want to feel for good this particular burning!! We do not withstand it too hot so this always results half of the spice sachet is left unused!!

One day I decided to make mixed vegetables, which I always make in the oven, lighter and healthier! And I have established that way and we love it!

I make it simple, with olive oil, a little red sauce, a little vegetable cube and extra virgin olive oil. Simple as that ... But this time I said to add from this mixture because I had an intuition that it would fit a lot, and also 2 tablespoons of quinoa which is a superfood, it is a vegetable protein and it is good to add it in moderation to our diet.

The result was that .. I probably would not cook it again with the a simple old way but only in this way !!!


I hope you enjoy it!


Good appetite!

------------------------------------------------------------------------------------------------
Text of the recipie to transform in Braille Czech1-English (UK)1 - English (US)1 - French Grade1and Unified Braille Code 1 via https://www.brailletranslator.org/  download it in .brf ASCII file and be able to print it in a suitable printer:

cooky cook
mixed vegetables in the oven with quinoa and flavor of mexico
we will need for two persons
two eggplants
two green zucchini
two large carrots
two potatoes
two tablespoons of quinoa
two teaspoons of red condensed sweet sauce
two teaspoons of spice mix for mexican tortillas
half a cube of vegetables
two tablespoons extra virgin olive oil
implementation
we wash the eggplants cut the stalks cut them into cubes and place in a lightly oiled baking dish or pyrex
we similarly wash the zucchini cut their stalks cut them into cubes and add them to our pan
we then wash and peel carrots then cut into round slices then cut into four and we add them to our dish
potatoes come next we wash peel cut into cubes leave them in a basin with water for a while to remove some of the starch drain and add to our pan
we pour the two tablespoons of quinoa
dilute the two tablespoons of red sauce in half a glass of water and add to our pan
sprinkle the two teaspoons of the mixture of hot spices for mexican tortillas
with a knife we gently scrape half of our vegetable cube into the pan
we add the two tablespoons of extra virgin olive oil and either by wearing gloves or with a spoon we mix well all of our ingredients
we add half a glass of water and bake in the oven at one hundred eighty degrees celsius for half an hour
our food is ready and we can enjoy it
caraba
history of the idea
i really like to buy these kits from various kitchens around the world such as sushi kits mexican taco kits mexican tortilla kits and much more
it is an easy and complete way to prepare a beautiful theme night
this kits include everything except the meat that is added fresh
usually in these mexican kits the spice mix sachets are oversized in terms of the amount of food that can be prepared
probably for people who want to feel for good this particular burning
we do not withstand it too hot so this always results half of the spice sachet is left unused
one day i decided to make mixed vegetables which i always make in the oven lighter and healthier
and i have established that way and we love it
i make it simple with olive oil a little red sauce a little vegetable cube and extra virgin olive oil
simple as that
but this time i said to add from this mixture because i had an intuition that it would fit a lot and also two tablespoons of quinoa which is a superfood it is a vegetable protein and it is good to add it in moderation to our diet
the result was that i probably would not cook it again with the simple old way but only in this way
i hope you enjoy it
good appetite


Πέμπτη 10 Οκτωβρίου 2019

Μοσχάρι κοκκινιστό με καυτερή μουστάρδα dijon και τυρί φέτα-Βraised beef with hot dijon mustard and greek feta cheese

(In English see below),
(To transform the recipie in Braille and print it in a suitable printer,select text and link down below)


Θα χρειαστούμε (για 2 άτομα):

  • 300 γρ μοσχάρι για κοκκινιστό,
  • Μια μικρή συσκευασία (70 γρ.) σάλτσα διπλής συμπύκνωσης ή φρέσκια τριμμένη σάλτσα από νοτμάτες,
  • 4 κουταλάκια γλυκού μουστάρδα dijon καυτερή,
  • 80 γρ. τυρί φέτα,
  • 1 κουταλιά σούπας ελαιόλαδο,

  • 2 κουταλάκια γλυκού αλάτι,

  • 2 πρέζες πιπέρι.

Εκτέλεση:
Σε μια κατσαρόλα με πολύ ζεστό νερό χωρίς αλάτι, βράζουμε το μοσχάρι για δυο ώρες περίπου. 
Σε μια κατσαρόλα επάνω σε μάτι που καίει, βάζουμε το ελαιόλαδο και περιμένουμε 2 λεπτά για να κάψει λίγο. 
Στη συνέχεια προσθέτουμε την κόκκινη σάλτσα.
Έπειτα από 2 λεπτά προσθέτουμε 1 ποτήρι νερό.
Μόλις αρχίσει να κοχλάζει, προσθέτουμε την μουστάρδα, τη φέτα, το αλάτι, το πιπέρι και το βρασμένο μοσχάρι.
Ανακατεύουμε μέχρι να δέσει η σάλτσα και το κοκκινιστό μας με την καυτερή μουστάρδα dijon είναι έτοιμο.

Εάν το φαγητό προορίζεται για κατανάλωση από παιδιά, αντικαταστήστε την καυτερή σάλτσα dijon με την απαλή μουστάρδα dijon και συνοδεύστε με τηγανιτές twister potatoes! Κι αν πάλι νιώθετε παιδιά οι ίδιοι, συνοδεύστε κι εσείς με τηγανιτές twister potatoes!!!

Καλή όρεξη!!!

Ιστορία της ιδέας:
Είναι εκπληκτικό το πόσο ευρηματικός μπορεί να γίνει ένας άνθρωπος με όσο λιγότερα μέσα έχει.
Κι έτσι συνέβη μια ημέρα, υπήρχαν μόνο αυτά τα υλικά κι ήθελα να μαγειρέψω κάτι όμορφο και διαφορετικό.
Άλλωστε, και η φίλη μου η Καλλιόπη μου είχε ζητήσει να σκεφτώ μια γρήγορη και εύκολη συνταγή με μοσχάρι για την μικρή της κόρη. Οπότε ήταν ευκαιρία να δοκιμάσω κάτι. Κι όπως έχω ξαναπεί,  κρεοπώλης μου μου είχε πει το μυστικό για να μαλακώνει το μοσχάρι, να το μαγειρεύω με λίγη μουστάρδα. Εδώ έβαλα περισσότερη. Επιπρόσθετα, επιλέγουμε να βράσουμε το κρέας και όχι να το ψήσουμε. Το βράσιμο λιώνει τον συνδετικό ιστό του κρέατος και τον μεταρέπει σε ζελατίνα. Το βράσιμο σε ζεστό νερό επιπρόσθετα βοηθάει ώστε να μη χάσει τους χυμούς του και να μείνει ζουμερό.
Τώρα που ο καιρός λίγο κρύωσε, είναι μια καλή ευκαιρία να απολαύσουμε λίγο πιο χειμερινές γεύσεις.
Συνοδεύεται άψογα με ένα κόκκινο ξηρό κρασί δωδεκάμηνης ωρίμανσης από την ποικιλία αγιωργίτικο!

2019_Δήμητρα Παπαδοπούλου

-------------------------------------------------------------------------------------------------------

We will need (for 2 persons):

  • 300 gr beef for braised beef,
  • a small pack (70 g) of double-condensed sauce or fresh grated tomato sauce,
  • 4 teaspoons of dijon hot mustard,
  • 80gr greek feta cheese,
  • 1 tablespoon olive oil,
  • 2 teaspoons of salt,
  • 2 pinch of pepper.

Implementation:
In a saucepan of very hot salt-free water, boil the beef for about two hours.
In a saucepan over a burning eye, put the olive oil and wait 2 minutes to burn a little.
Then add the red sauce.
After 2 minutes add 1 glass of water.
Once it starts to thicken, add the mustard, feta cheese, salt, pepper and boiled beef.
Stir until the sauce is cooked and our red mustard with dijon mustard is ready.

If the food is for children, replace the hot dijon mustard with the soft and serve with French twister potatoes! And if you aswell feel like children yourself, go with the French twister potatoes too!

Good appetite!!!

History of the idea:
It is amazing how inventive a person can become with as little means as he has.
And so it happened one day, there were only these ingredients and I wanted to cook something beautiful and different.
And by the way, my friend Kalliopi had asked me to think of a quick and easy veal recipe for her little daughter. So it was an opportunity to try something. As I've said before, my butcher had told me the secret to softening beef, to cook it with a little mustard. I put more here. In addition, we choose to boil the meat rather than bake it. Boiling melts the connective tissue of the meat and turns it into jelly. Boiling in hot water additionally helps not to lose its juices and stay juicy.
Now that the weather has cooled down a bit, it's a good opportunity to enjoy some more wintery flavors.
Accompanied perfectly with a red dry twelve month maturing wine from the Agiorgitiko variety!

2019_Dimitra Papadopoulou

------------------------------------------------------------------------------------------------------
Text of the recipie to transform in Braille Czech1-English (UK)1 - English (US)1 - French Grade1and Unified Braille Code 1 via https://www.brailletranslator.org/  download it in .brf ASCII file and be able to print it in a suitable printer:

cooky cook
braised beef with hot dijon mustard and greek feta cheese
we will need for two persons
three hundred grams of beef for braised beef
a small cane of double condensed sauce or fresh grated tomato sauce
four teaspoons of dijon hot mustard
eighty grams of feta cheese
one tablespoon olive oil
two teaspoons of salt
two pinch of pepper
implementation
in a saucepan of very hot salt-free water boil the beef for about two hours
in a saucepan over a burning eye put the olive oil and wait two minutes to burn a little
then add the red sauce
after two minutes add one glass of water
once it starts to thicken add the mustard feta cheese salt pepper and boiled beef
stir until the sauce is cooked and our red mustard with dijon mustard is ready
if the food is for children replace the hot dijon mustard with the soft and serve with french twister potatoes
and if you aswell feel like children yourself go with the french twister potatoes too
good appetite
history of the idea
it is amazing how inventive a person can become with as little means as he has
and one day there were only these ingredients and ;i wanted to cook something beautiful and different
and by the way my friend kalliopi had asked me to think of a quick and easy veal recipe for her little daughter
so it was an opportunity to try something
as i have said in the past in another recipie my butcher had told me the secret to softening beef is to cook it with a little mustard
i put more here
in addition we choose to boil the meat rather than bake it boiling melts the connective tissue of the meat and turns it into jelly boiling in hot water additionally helps not to lose its juices and stay juicy
now that the weather has cooled down a bit it is a good opportunity to enjoy some more wintery flavors
accompanied perfectly with a red dry twelve month maturing wine from the agiorgitiko variety
2019 dimitra papadopulu


Πέμπτη 3 Οκτωβρίου 2019

Croque madame με Π.Ο.Π τυρί κασέρι, αβγά ελευθέρας βοσκής και πεταλούδες από παντζάρι-Croque madame with PDO kasseri cheese, free-range grazing eggs and beetroot butterflies

(In English see below),
(To transform the recipie in Braille and print it in a suitable printer,select text and link down below)

Θα χρειαστούμε (για 2 μερίδες): 
  • 2 μεγάλες φέτες ψωμί για τοστ,
  • 80 γρ Π.Ο.Π τυρί κασέρι,
  • 2 αβγά ελευθέρας βοσκής,
  • 2 λουκάνικα φρανκφούρτης,
  • 2 βρασμένα παντζάρια,
  • 1 κουταλιά σούπας εξαιρετικό παρθένο ελαιόλαδο.
  • 2 ποτήρια χυμό από κόκκινα φρούτα,
  • 2  καλές φίλες για να πουν τα νέα τους :) .
Εκτέλεση:
Σε κάθε μια από δυο μακρόστενες όμορφες πιατέλες , τοποθετούμε στην άκρη από ένα τοστ, το οποίο έχουμε ετοιμάσει χρησιμοποιώντας δυο μεγάλες φέτες ψωμί για τοστ, 40 γρ Π.Ο.Π τυρί κασέρι στο ενδιάμεσο και το έχουμε ψήσει ελαφρώς σε τοστιέρα.

Τοποθετούμε στο μάτι της κουζίνας ένα αντικολλητικό τηγάνι.
Ανάβουμε το μάτι στη μέγιστη θερμοκρασία.
Προσθέτουμε 1/2 κουταλιά σούπας εξαιρετικό παρθένο ελαιόλαδο.
Μόλις κάψει λίγο σπάμε και τηγανίζουμε τα αβγά ελευθέρας βοσκής σε μάτια.

Μόλις ψηθούν κατά το ήμισυ, ή περισσότερο ανάλογα με τα γούστα του καθενός, τα αφαιρούμε προσεκτικά, ώστε να μη σπάσουν ιδιαίτερα, και τοποθετούμε το καθένα επάνω στο κάθε τοστ.

Τοποθετούμε τα λουκάνικα Φρανκφούρτης σε νερό που βράζει για 5 λεπτά.

Αφαιρούμε, κόβουμε και διακοσμούμε δίπλα στο τοστ.

Σε μια επιφάνειας κοπής, κόβουμε τα δυο παντζάρια σε σχετικά χοντρές και ομοιόμορφες φέτες.

Με ένα κουπ-πατ σε σχήμα πεταλούδας κόβουμε την κάθε φέτα παντζαριού.

Τοποθετούμε τις πεταλούδες ομοιόμορφα και ισόποσα στην υπόλοιπη επιφάνεια από κάθε πιατέλα.

Μοιράζουμε το υπόλοιπο εξαιρετικό παρθένο ελαιόλαδο γύρω από τις πεταλούδες σε ομοιόμορφες σταγόνες.

Το πιάτο μας κυρίες είναι έτοιμο για να το απολαύσουμε!

Συνοδεύστε με ένα ποτήρι φρέσκο χυμό από κόκκινα φρούτα!

Καλή όρεξη!

-------------------------------------------------------------------------------------------------------------------------
We will need (for 2 servings):
  • 2 large slices of toast bread,
  • 80 gr PDO kasseri cheese,
  • 2 Large free-range grazing eggs,
  • 2 Frankfurt sausages,
  • 2 boiled beetroots,
  • 1 tablespoon of extra virgin olive oil,
  • 2 glasses of red fruit juice,
  • 2 good friends to tell their news :)
Implementation:
On each of two elongated beautiful platters, we set aside a toast, which we have prepared using two large slices of toasted bread, 40 g PDO kasseri cheese in the middle and toasted slightly in a toaster.

Place a non-stick frying pan in the kitchen.
Turn the eye on at maximum temperature.
Add 1/2 tbsp of extra virgin olive oil.
As soon as it burns a little we break and prepare 2 fried eggs.

Once cooked in half or more, depending on the way everyone wants it, remove them carefully so they do not break too much, and place each on top of each toast.

Place the 2 Frankfurt sausages in boiling water for 5 minutes.

Remove, cut and decorate next to each toast.

On a cutting surface, cut the two beetrootss into relatively thick and even slices.

Cut every slice of the beetroots with a butterfly-shaped cutout.

Place the butterflies evenly on the rest of the surface of each platter.

Spread the rest of the extra virgin olive oil around the butterflies in even drops.

Our plate is ready to enjoy!

Serve with a glass of fresh red fruit juice!

Good appetite!

2019_Dimitra Papadopoulou
-----------------------------------------------------------------------------------------------------------------
Text of the recipie to transform in Braille Czech1-English (UK)1 - English (US)1 - French Grade1and Unified Braille Code 1 via https://www.brailletranslator.org/  download it in .brf ASCII file and be able to print it in a suitable printer:
cooky cook
croque madame with protected designation of origin kasseri cheese free range grazing eggs and beetroot butterflies
we will need for two servings
two large slices of toast bread
eighty grams of protected designation of origin kasseri cheese
two large free range grazing eggs
two frankfurt sausages
two boiled beetroots
one tablespoon of extra virgin olive oil
two glasses of red fruit juice
two good friends to tell their news
implementation
on each of two elongated beautiful platters we set aside a toast which we have prepared using two large slices of toasted bread forty grams protected designation of origin kasseri cheese in the middle and toasted slightly in a toaster
place a non stick frying pan in the kitchen
turn the eye on at maximum temperature
add half tablespoon of extra virgin olive oil
as soon as it burns a little we break and prepare two fried eggs
once cooked in half or more depending on the way everyone wants it remove them carefully so they do not break too much
place each on top of each toast
place the two frankfurt sausages in boiling water for five minutes
remove cut and decorate next to each toast
on a cutting surface cut the two beetroots into relatively thick and even slices
next cut every slice with a butterfly-shaped cutout
place the butterflies evenly on the rest of the surface of each platter
spread the rest of the extra virgin olive oil around the butterflies in even drops
our plate is ready to enjoy
serve with a glass of fresh red fruit juice
good appetite
2019 dimitra papadopulu

Τρίτη 24 Σεπτεμβρίου 2019

Νούντλς με ψητό κοτόπουλο, εξαιρετικό παρθένο ελαιόλαδο και ινδικό μείγμα Μασάλα για τσάι-Noodles with roasted chicken, extra virgin olive oil and Indian mixture of Μasala for tea!


(In English see below),
(To transform the recipie in Braille and print it in a suitable printer,select text and link down below)

Θα χρειαστούμε, για 2 μερίδες: 
  • 2 πακετάκια νούντλς (πωλούνται στα σούπερ μάρκετ και σε συσκευασίες των 5),
  • Μισό ψητό κοτόπουλο σούβλας όπως το αγοράζουμε έτοιμο απ'έξω,
  • 2 κουταλιές της σούπας εξαιρετικό παρθένο ελαιόλαδο,
  • 2 κουταλάκια του γλυκού Ινδικό μείγμα Μασάλα για τσάι*,
  • 2 πρέζες αλάτι,
  • 2 πρέζες φρεσκοτριμμένο πιπέρι.


*(Προσοχή, όχι το μείγμα Γκάραμ Μασάλα, αυτό είναι κάτι τελείως διαφορετικό!
 Εμείς θέλουμε το μείγμα Μασάλα για τσάι. Θα βρείτε στα σημεία πώλησης βοτάνων ή στα καταστήματα ντελικατέσεν, στα καταστήματα πώλησης τσαγιού κλπ.)

Εκτέλεση:
Τοποθετούμε σε ένα βαθύ σκεύος τις δυο μερίδες νούντλς.
Βράζουμε αρκετό νερό και σκεπάζουμε με αυτό τις μερίδες νούντλς.
Αφήνουμε δέκα λεπτά ώστε να φουσκώσουν. Αυτός είναι ο τρόπος που μαγειρεύονται, δεν χρειάζονται βράσιμο.
Πετάμε έπειτα από δέκα λεπτά το νερό που έχει περισσέψει καθώς τα νούντλς μας είναι ήδη είναι ήδη έτοιμα. Δεν τα σουρώνουμε. Επιδιώκουμε να έχει παραμείνει και λίγο από το νερό.
Ξεχωρίζουμε το κρέας από το ψητό κοτόπουλο, πετάμε τα κόκαλα και την πέτσα. Κόβουμε σε μικρά κομματάκια.
Τοποθετούμε στο μάτι της κουζίνας ένα σκεύος κατσαρόλας, ανάβουμε στο μέγιστο το μάτι.
Ρίχνουμε μια κουταλιά σούπας από το εξαιρετικό παρθένο ελαιόλαδο.
Ρίχνουμε τα κομμάτια από το κοτόπουλο.
Ανακατεύουμε για πέντε λεπτά με μία ξύλινη κουτάλα.
Ρίχνουμε στο σκεύος τα νούντλς και ανακατεύουμε ελαφρώς.
Προσθέτουμε το ένα κουταλάκι γλυκού από το Ινδικό μείγμα Μασάλα για τσάι.
Κλείνουμε το μάτι της κουζίνας.
Ανακατεύουμε ελαφρώς και μόλις εξατμιστούν τα υγρά αφαιρούμε το σκεύος από το μάτι.
Προσθέτουμε την δεύτερη κουταλιά σούπας από το εξαιρετικό παρθένο ελαιόλαδο, το δεύτερο κουταλάκι του γλυκού από το Ινδικό μείγμα Μασάλα για τσάι, τις δύο πρέζες αλάτι και τις δυο πρέζες από το φρεσκοτριμμένο πιπέρι.

Σερβίρουμε σε δύο όμορφα πιάτα της αρεσκείας μας και απολαμβάνουμε!!

Καλή όρεξη!!!

Ιστορία της ιδέας:
Η Κίνα συναντιέται με την Ινδία στην Ελλάδα.
Τα νούντλς φροντίζω να υπάρχουν πάντα στην κουζίνα μου καθώς είναι πολύ γρήγορα στην προετοιμασία τους. Δεν χρειάζονται βράσιμο, παρά μόνο να φουσκώσουν για δέκα λεπτά σε βραστό νερό. Κι όταν υπάρχει βραστήρας στο σπίτι, η προετοιμασία τους πραγματικά κρατάει μόνο δέκα λεπτά.
Το έτοιμο ψητό κοτόπουλο σούβλας επίσης είναι μια από τις συχνές επιλογές, είναι νόστιμο, οικονομικό, έτοιμο. Είναι με λίγα λόγια μία τέλεια επιλογή.
Το Ινδικό μείγμα Μασάλα για τσάι, μου το έφερε δώρο η φίλη μου η Καλλιόπη κατά την επιστροφή της από ένα επαγγελματικό της ταξίδι στην Ινδία. Πρόκειται για ένα μείγμα από αρωματικά ινδικά μπαχαρικά, βότανα και γλυκαντικές ουσίες, με το οποίο αρωματίζουν το τσάι. Κι εμένα μου αρέσει πολύ το τσάι!
Περιέχει κάρδαμο, κανέλα, γαρίφαλο, πιπερόριζα, λίγη ζάχαρη και μαύρο πιπέρι.
Μύρισε Ινδία, έτσι δεν είναι; 
Είχα όλα αυτά τα υλικά και θεώρησα ότι μεταξύ τους ταιριάζουν πολύ κι έτσι τα συνδύασα.
Πράγματι επιβεβαιώθηκα και ταξιδέψαμε νοερά και γευστικά από την Κίνα έως την Ινδία και πίσω.
Το ελληνικό εξαιρετικό παρθένο ελαιόλαδο, ιδιαίτερα το ωμό που πρόσθεσα στο τέλος, πιστέψτε με έκανε επίσης μεγάλη διαφορά στο γευστικό αποτέλεσμα!!!

2019_Δήμητρα Παπαδοπούλου

-------------------------------------------------------------------------------------------------------------------
We will need, for 2 servings:

  • 2 packs of noodles (sold in supermarkets even in packs of 5),
  • Half roast chicken skewered as we buy it ready from the store,
  • 2 tablespoons extra virgin olive oil,
  • 2 teaspoons Indian Masala mixture for Tea *,
  • 2 pinches of salt,
  • 2 pinches of freshly ground pepper.
* (Caution, not the Garam Masala mix, this is something completely different!
 We want Masala mixture for tea. You will find it at herbal shops or delicatessen shops, tea shops, etc.)

Implementation:
We place two portions of noodles in a deep pan.
We boil plenty of water and cover the noodle portions with it.
We leave ten minutes for them to rise. This is the way they are cooked, they do not need boiling.
After ten minutes we throw away the water that has left over as our noodles are already ready. We don't strain them. We strive to have some water left over.
We separate the meat from the roast chicken, toss the bones and the bun. We cut into small pieces.
We place a pan in the kitchen eye, light the eye to the maximum.
We pour a tablespoon of extra virgin olive oil.
We pour the pieces of chicken.
We stir for five minutes with a wooden spoon.
Then we pour the noodles into the pan and mix slightly.
We add one teaspoon of Indian Masala mixture for Tea.
We close the kitchen eye.
We stir slightly and as soon as the liquids evaporate we remove the container from the eye.
Finally we add the second tablespoon of extra virgin olive oil, the second teaspoon of Indian masala mixture for tea, two pinches of salt and two pinches of freshly ground pepper.

We serve in two beautiful dishes of our choice and enjoy !!

Good appetite!!!


History of the idea:
China meets India in Greece.
Noodles are always present in my kitchen as they are very quick to prepare. They do not need to be boiled except to soak for ten minutes in boiling water. And when there is a kettle in the house, their preparation really only takes ten minutes.
Ready roast chicken is also one of the common choices, it is tasty, economical, ready. In short it's a perfect choice.
The Indian Masala mixture for tea was gifted to me by my good friend Kalliopi on her return from a business trip to India. It is a blend of aromatic Indian spices, herbs and sweeteners, with which to flavor the tea. And I really like tea!
It contains cardamom, cinnamon, cloves, ginger, some sugar and black pepper.
I had all these materials and I found them to be a great fit and so I combined them.
Indeed, I was confirmed and we traveled mentally and tastefully from China to India and back.
Greek extra virgin olive oil, especially the raw one I added at the end, believe me also made a big difference to the tasty result !!!

2019_Dimitra Papadopoulou
----------------------------------------------------------------------------------------------------------------------
Text of the recipie to transform in Braille Czech1-English (UK)1 - English (US)1 - French Grade1and Unified Braille Code 1 via https://www.brailletranslator.org/  download it in .brf ASCII file and be able to print it in a suitable printer:
cooky cook
noodles with roasted chicken greek extra virgin olive oil and indian mixture of masala for tea
we will need for two servings
two packs of noodles
half roast chicken skewered as we buy it ready from the store
two tablespoons extra virgin olive oil
two teaspoons indian masala mixture for tea
caution not the garam masala mixture
this is totaly different
two pinches of salt
two pinches of freshly ground pepper
implementation
we place two portions of noodles in a deep pan
we boil plenty of water and cover the noodle portions with it
we leave ten minutes for them to rise
they do not need boiling4
after ten minutes we throw away the water that has left over as our noodles are already ready
we do not strain them we strive to have some water left over
we separate the meat from the roast chicken toss the bones and the bun and we cut into small pieces
we place a pan in the kitchen eye and open it to the maximum temperature
we pour a tablespoon of extra virgin olive oil
we pour the pieces of chicken
we stir for five minutes with a wooden spoon
then we pour the noodles into the pan and mix slightly
we add one teaspoon of indian masala mixture for tea
we then close the kitchen eye
we stir slightly and as soon as the liquids evaporate we remove the container from the eye
finally we add the second tablespoon of extra virgin olive oil the second teaspoon of indian masala mixture for tea two pinches of salt and two pinches of freshly ground pepper
we serve in two beautiful dishes of our choice and enjoy
good appetite
2019 dimitra papadopulu


Σάββατο 14 Σεπτεμβρίου 2019

Τονοσαλάτα με ντομάτα, φλύδες καρότου, παντζάρι, σπόρους τσία και κουρκουμά-Tuna salad with tomato, peels of carrot, beetroot, chia seeds and turmeric!

(In English see below),

(To transform the recipie in Braille and print it in a suitable printer,select text and link down below)


Θα χρειαστούμε (για δυο μεγάλα μπολ σαλάτας): (In English see below)

  • 2 συσκευασίες τόνο σε εξαιρετικό παρθένο ελαιόλαδο,
  • 2 μεγάλες κόκκινες γλυκιές ντομάτες,
  • 2 κουταλιές γλυκού σπόρους τσία (chia σπόροι),
  • 8 καρότα,
  • 2 βολβούς βρασμένο παντζάρι και
  • 2 κουταλιές του γλυκού κουρκουμά.


Εκτέλεση:

Σε κάθε ένα από τα δυο μπολ σαλάτας, κόβουμε σε κομμάτια της αρεσκείας μας τη ντομάτα, αφού πρώτα την έχουμε πλύνει καλά.

Ρίχνουμε από ένα κουταλάκι σπόρους τσία (chia) ομοιόμορφα και ανακατεύουμε για να διογκωθούν ελαφρώς από τα υγρά της ντομάτας.

Έπειτα προσθέτουμε σε κάθε ένα μπολ από μια συσκευασία τόνο, μαζί με μια κουταλιά της σούπας από το εξαιρετικό παρθένο ελαιόλαδο που περιέχει! Δεν χρειάζεται να προσθέσουμε επιπρόσθετο ελαιόλαδο, έχουμε ήδη όσο μας χρειάζεται!!!

Στη συνέχεια ξεφλουδίζουμε με το peeler τα καρότα, πετάμε την εξωτερική φλούδα, και συνεχίζουμε να τα κόβουμε σε φλύδες με τον ίδιο τρόπο. Με τον τρόπο αυτό κοπής προσθέτουμε σε κάθε ένα μπολ από τέσσερα καρότα.

Αυτή η μέθοδος κοπής είναι η αγαπημένη μου για τα καρότα, λίγο πιο χρονοβόρα αλλά εξαιρετικού αποτελέσματος, τόσο στη γεύση,
όσο και στην υφή αλλά και στην εμφάνιση. Πρόκειται για λεπτές μακρόστενες φλούδες καρότου που μοιάζουν με το ζυμαρικό ταλιατέλα, όπως συνηθίζω να λέω.

Συνεχίζουμε προσθέτοντας από ένα βολβό βρασμένου παντζαριού σε κομμάτια της αρεσκείας μας.

Μια ωραία τεχνική που χρησιμοποιώ είναι η εξής, τα κόβω πρώτα σε λεπτές φέτες και μετά δίνω σχήματα με μικρά κουπάτ ζαχαροπλαστικής. Έτσι για την ομοιομορφία και το παιχνίδισμα!
Αυτό θα απογειώσει το οπτικό αποτέλεσμα λόγου χάρη σε κάποιο επίσημο τραπέζι η και σε πιο ανεπίσημο τραπέζι με φίλους.

Τέλος, πασπαλίζουμε σε κάθε μπολ σαλάτας από ένα κουταλάκι του γλυκού κουρκουμά.

Ανακατεύουμε και η σαλάτα μας είναι έτοιμη για να την απολαύσουμε!

Υ.γ. εάν μαγειρευτεί ελαφρώς για περίπου 20 λεπτά σε κατσαρολάκι, μπορεί να αποτελέσει και σάλτσα για ζυμαρικά.


Καλή όρεξη!!!


Ιστορία της ιδέας:
Προχτές το μεσημέρι, ήθελα να ετοιμάσω για να φάμε μια τονοσαλάτα. Κι όταν το φθινόπωρο μπαίνει και η θερμοκρασία λίγο πέφτει, μου αρέσει πολύ να δημιουργώ συνταγές με τα πορτοκαλοκόκκινα χρώματα του προχωρημένου αυγουστιάτικου ηλιοβασιλέματος ... Είχα λοιπόν επιπλέον, ντομάτες γλυκές γλυκές (μας αρέσει να είναι λίγο ώριμες με τους ωραίους γλυκούς χυμούς τους). Είχα σπόρους τσία (chia σπόροι), οι οποίοι ανήκουν στην κατηγορία των ευεργετικών υπερτροφών (superfoods) και οι οποίοι επιβάλλεται πριν καταναλωθούν να διογκωθούν ελαφρώς σε βρώσιμο υγρό, στην περίπτωση μας στο χυμό της ντομάτας.

Καρότα αλλά και συσκευασία από βρασμένα παντζάρια φροντίζω να υπάρχουν πάντα στο ψυγείο.

Τέλος είχα και τον κουρκουμά, τον οποίο η διατροφολόγος μου, μου έχει πει να χρησιμοποιώ όσο το δυνατόν περισσότερο στη μαγειρική, καθώς είναι πολύ πολύ ευεργετικός και βοηθάει στο μεταβολισμό!

Δεν έχω λόγια να περιγράψω τον χρωματικό αλλά και γευστικό συνδυασμό που προέκυψε!
Ειλικρινά, τέτοια τονοσαλάτα δεν έχετε ξαναφάει !!!!

Καλή σας όρεξη!!!

2019_Δήμητρα Παπαδοπούλου

-----------------------------------------------------------------------------------------------------------------
We will need (for two large bowls of salad):
  • 2 packs of tuna in extra virgin olive oil, 
  • 2 big red sweet tomatoes,
  • 2 teaspoons of chia seeds,
  • 8 carrots,
  • 2 boiled beetroot bulbs and
  • 2 teaspoons of sweet turmeric.
Implementation:

In each of the two salad bowls, we cut the tomato into pieces of our choice, after first washing it thoroughly.

We pour a teaspoon of the chia seeds evenly and stir so that they slightly inflate into the tomato juices.

Then we add to each bowl a pack of tuna, along with a tablespoon of the extra virgin olive oil it contains! There is no need to add extra olive oil, we already have as much as we need.

We keep the remaining leftover in his jar for making some seafood pasta possibly another day.

Afterthat we peel the carrots and add to each bowl four slices of carrots, which we create with the peeler. I call it "peeler type cut" (see photo). It's my favorite type of carrot cut, a little more time consuming but great, both in taste and appearance. These are thin, elongated carrot peels that look like pasta tagliatelle, as i say.

We add in each salad bowl a boiled beetroot bulb to pieces of our choice.

A good idea would be to cut them into thin slices first and then shape them with a cookie cuter. So for uniformity and playingfulness!

We sprinkle with a teaspoon of turmeric.

Finally we stir and our salad is ready to be consumed!

PS if cooked lightly for about 20 minutes in a saucepan, it can also be used as pasta sauce

History of the idea:
The day before yesterday, I wanted to prepare a tuna salad. And when autumn comes and the temperature drops a little, I really like to create recipes with the orange colors of the advanced August sunset ... So I also had sweet sweet tomatoes (we like them a bit ripe with with their sweet juices). I had chia seeds, which belong to the category of superfoods, and which requires before being consumed to inflate slightly in edible liquid, in our case the tomato juice.

I always make sure to have in the fridge carrots and packaging of boiled beetroot.

Finally I had turmeric, which my nutritionist has told me to use in cooking as much as possible, as it is very beneficial and helps metabolism!

I have no words to describe the color but also the delicious combination that emerged!

Honestly, such tuna salad you have never eaten again !!!!

Good appetite!!!

2019_Dimitra Papadopoulou
--------------------------------------------------------------------------------------------------------------
Text of the recipie to transform in Braille Czech1-English (UK)1 - English (US)1 - French Grade1and Unified Braille Code 1 via https://www.brailletranslator.org/  download it in .brf ASCII file and be able to print it in a suitable printer:
cooky cook
tuna salad with tomato peeler cut carrot
beetroot chia seeds and turmeric
we will need for two large bowls of salad
two packs of tuna in greek extra virgin olive oil
two big red sweet tomatoes
two teaspoons of chia seeds
eight carrots
two boiled beetroot bulbs and
two teaspoons of sweet turmeric
implementation
in each of the two salad bowls we cut the tomato into pieces of our choice after first washing it thoroughly
we pour a teaspoon of the chia seeds evenly and stir so that they slightly inflate into the tomato juices
then we add to each bowl a pack of tuna along with a tablespoon of the extra virgin olive oil it contains
there is no need to add extra olive oil we already have as much as we need
we keep the remaining leftover in his jar for making some seafood pasta possibly another day
afterthat we peel the carrots and add to each bowl four slices of carrots which we create with the peeler
i call it peeler type cut an it is my favorite type of carrot cut a little more time consuming but great in taste and texture
thin elongated carrot peels
we add in each salad bowl a boiled beetroot bulb to pieces of our choice
a good idea would be to cut them into thin slices first and then shape them with a cookie cuter
for uniformity and playingfulness
we sprinkle with a teaspoon of turmeric
finally we stir and our salad is ready to be consumed
postscript if cooked lightly for about twenty minutes in a saucepan it can also be used as pasta sauce
history of the idea
the day before yesterday ;i wanted to prepare a tuna salad
and when autumn arrives and the temperature drops a little ;i really like to create recipes with ingredients that are more red like tomatoes beetroots and carrots
so i had sweet sweet tomatoes we like them a bit ripe with with their sweet juices
chia seeds which belong to the category of superfoods and which requires before being consumed to inflate slightly in edible liquid in our case the tomato juice
always make sure to have in the fridge carrots and packaging of boiled beetroots
finally i had turmeric which my nutritionist has told me to use in cooking as much as possible as it is very beneficial and helps metabolism
there are no words to describe the delicious combination that emerged
honestly such tuna salad you have never eaten before
good appetite
2019 dimitra papadopulu


Πέμπτη 12 Σεπτεμβρίου 2019

Pink dimini - White Soursweet gin (Theme cocktails for her and him)

Θα χρειαστούμε:  (in English see below)

Για το Pink dimini:
2 μεζούρες ροζ τζιν,
3 μεζούρες λεμονάδα με ανθρακικό ή αλλιώς λεμονίτα,
μισή κουταλιά σούπας στημένο λεμόνι,
για το γαρνίρισμα, από μια πολύ λεπτή στριφογυριστή φλούδα πορτοκαλιού την οποία ρίχνουμε μέσα στο cocktail.

Για το White Ss (Soursweet):
2 μεζούρες λευκό τζιν,
3 μεζούρες λεμονάδα με ανθρακικό ή αλλιώς λεμονίτα,
μισή κουταλιά σούπας στημένο λεμόνι,
για το γαρνίρισμα, από μια πολύ λεπτή στριφογυριστή φλούδα λεμονιού την οποία ρίχνουμε μέσα στο cocktail.

Εκτέλεση:

Τοποθετούμε όλα τα υλικά με τη σειρά που παραθέτονται πιο πάνω,  αναδεύουμε ελαφρώς, προσθέτουμε ένα όμορφο καλαμάκι της αρεσκείας μας και είναι...

Έτοιμα!

Τα cocktail αυτά είναι επικίνδυνα τέλεια γι'αυτό απολαύστε υπεύθυνα!!!!

Ιστορία της ιδέας:,
Εγώ προσωπικά το gin το αγαπώ, με μέτρο πάντα :) , ... έχει τόση πίκρα όση του χρειάζεται... και πάντα σκεφτόμουν "γιατί ο κόσμος του βάζει τόνικ...; το σέβομαι αλλά δεν το καταλαβαίνω ^_^ ....αφού είναι ήδη πικρούτσικο..." ^_^ ..αλλά γούστα είναι αυτά και είναι καθόλα σεβαστά, άλλωστε το gin tonic δεν έχει γίνει τυχαία ένα παγκόσμιο best seller ποτό... !!! Εγώ λοιπόν ήθελα να το γλυκίσω λίγο... κι επέλεξα την ανθρακούχο λεμονάδα....για να έχει και μια σπιρτάδα από τις μπουρμπουλήθρες... όλα καλά μέχρι εδώ αλλά και πάλι... μια μικρή αίσθηση ανεκπλήρωτου, την ένιωθα... όπως όταν θέλεις να πιεις cuba libre αλλά έχεις μόνο το ρούμι και την κόλα... αυτό το ανεκπλήρωτο...ναι... το ανεκπλήρωτο του γλυκόξινου!!! Κι έτσι πρόσθεσα και λίγο στημένο λεμόνι για να σπάσει τη γλύκα... έτσι γεννήθηκε το cocktail WSs... ήταν λίγο άγριο όμως εμφανισιακά, λίγο ακατέργαστο για την γυναικεία μας φύση, όχι σαν τα όμορφα πουπουλένια cocktail... χρειαζόμουν κάτι ακόμη.. η γεύση του μου άρεσε πολύ αλλά εμφανισιακά...μου έλειπε κάτι ακόμη...!!! Mια μέρα λοιπόν ανακάλυψα ότι υπάρχει ροζ gin!!! Τι Αποκάλυψη!!! το δοκίμασα, κι αυτό ήταν... γεννήθηκε το cocktail Pin dimini!!! Η φλούδα πορτοκαλιού ήταν πρωτοβουλία του bartender, του πήγε πολύ και το κράτησα, στο White Ss όμως, θα προτιμήσω εκείνη του λεμονιού που του πάει καλύτερα!!!


Bachelorette, Βachelor and Bridal party idea

Το pink dimini, τόσο σε χρώμα όσο και σε γεύση, είναι τέλειο για bachelorette και νυφικά πάρτι!!!

Όπως τα ροζ όνειρα σε ροζ σύννεφα !!!

Και οι κύριοι μπορούν να προετοιμάσουν το White Ss στο δικό τους πάρτι !!!

Με αυτό τον τρόπο και οι δύο μπορούμε να έχουμε πάρτι με παρόμοια κοκτέιλ, κάτι σαν θεματικό πάρτι !!!

Κατ'επέκταση, μπορούμε να σερβίρουμε τα δύο διαφορετικά αλλά παρόμοια κοκτέιλ στο γάμο και στη γαμήλια δεξίωσή μας !!!

Αυτά τα θεματικά cocktail, θα τα λατρέψετε!!!!

Απολαύστε σε κάθε περίπτωση!!!

2019_Δήμητρα Παπαδοπούλου


-----------------------------------------------------------------------------------------------------------------------
We will need:

For pink dimini:
2 measuring tapes of pink gin,
3 measuring tapes of carbonated lemonade,
half a tablespoon of lemon zest or squezed lemon,
for garnishing, a very thin and twisted orange peel that we pour into the cocktail.

For White Ss (Soursweet):
2 measuring tapes of white gin,
3 measuring tapes of carbonated lemonade,
half a tablespoon of lemon zest or squezed lemon,
for garnishing, a very thin and twisted orange peel that we pour into the cocktail.

Implementation:
We put all the ingredients in the order listed above, we stir a little, we add a nice straw of our choice and it is ...

Ready!

These cocktails are dangerously perfect so enjoy it responsibly !!!!

History of the idea :,
I personally love gin, in moderation always :), ... it is as much bitter as it needs ... and I was always thinking "why people put tonic on it ...? I respect it but i don't understand it ^ _ ^ .. .. since it is already bitter ... "^ _ ^ .. buy as i said, everyone as he likes it, and it is of course respected, after all, gin tonic has not accidentally become a worldwide best seller ... !!! So I wanted to sweeten it up a bit ... and chose the sparkling lemonade .... to have a raciness because of the bubbles  ... all ok, up untill here and yet again ... i felt a little feeling of unfulfilled.. like when you want to drink Cuba libre but you only have rum and cola ... this feeling of unfulfilled ... yes ... the unfulfilled of soursweet !!! And so I added a little bit of lemon to break the sweetness ... that's how the cocktail WSs was born ... it was very tastefull but visibly a little raw for our feminine nature, not like the pretty cocktail with colors and feathers ... I needed something more. I really liked the taste but apparently ... I still lacked something ... !!! So one day I found out there is pink gin !!! Ah, what a revelation !!! I tried it, and that was it... the cocktail Pink dimini was born !!! The orange peel was the bartender's initiative, it matched perfectly and I kept it, but at White Ss, I would prefer the lemon peel, it suits better!!!


Bachelorette, Βachelor and Bridal party idea!!!!
Pink dimini is a perfect cocktail for hen's, bachelorette's party!!! Like pink dreams in pink clouds!!!

And gentlemens can prepare aswell the White Ss at their own bachelor's party!!!

Both can have this theme party with similar cocktails at their party's!!!

Both can serve the two different but similar cocktails at their Wedding - Bridal party!!!

These theme cocktails, you will love it!!!

Njoy in any case!!!


2019_Dimitra Papadopoulou

Τρίτη 10 Σεπτεμβρίου 2019

Βότκα με λικέρ Kουμκουάτ, γλυκό κουταλιού κουμκουάτ, βροχή από Λιμοντσέλο και σταγόνες από Λεμόνι - Vodka with Kumquat liqueur, Kumquat sweet spoon, Limoncello rain and Lemon drops

Θα χρειαστούμε (για κάθε ένα από δυο ποτήρια):  (in English see below)

2 μεζούρες παγωμένη βότκα,
1 μεζούρα λικέρ κουμκουάτ,
1 μικρό κουμκουάτ από γλυκό του κουταλιού,
3 σταγόνες από λεμόνι,
1 μεζούρα λικέρ λιμοντσέλο σε δοχείο για σπρέι ειδικό για φαγητό.

Εκτέλεση:
Σε κάθε ένα από δυο ποτήρια, προσθέτουμε τα υλικά με την εξής σειρά:
τις 2 μεζούρες παγωμένης βότκα, έπειτα τη μεζούρα λικέρ κουμκουάτ, στη συνέχεια το μικρό κουμκουάτ από γλυκό κουταλιού, τις 3 σταγόνες από λεμόνι, τέλος τοποθετούμε τη μεζούρα από το λικέρ λιμοντσέλο στο δοχείο ψεκασμού και ψεκάζουμε 2 φορές στην επιφάνεια αφήνοντας τις χρυσές σταγόνες να πέσουν σαν βροχή στο κοκτέιλ μας :)

Αφού καταναλώσετε το κοκτέιλ σας, μπορείτε να φάτε το γλυκάκι σας του κουταλιού.. το οποίο θα έχει απορροφήσει αλκοόλ οπότε...

Απολαύστε υπεύθυνα!!!!!

η φωτογραφία δεν είναι δική μου αλλά την πήρα από το ίντερνετ, δεν μπορώ να την ξαναβρώ για να δώσω το url που παραπέμπει σε αυτήν, είναι όμως τόσο όμορφη. Παρακαλώ αν τη δει κάποιος ας με βοηθήσει για να προσθέσω το url παραπομπής, ευχαριστώ. 

2019_Δήμητρα Παπαδοπούλου

-----------------------------------------------------------------------------------------------------------------
We will need (for each of two glasses):

2 measures of frozen vodka,

1 kumquat liqueur measuring tape,

1 small kumquat of sweet spoon,

3 drops of lemon,

1 teaspoon limoncello liqueur in a special sparay container for food.


Implementation:

To each of the two glasses, we add the materials in the following order:

2 tablespoons of the frozen vodka, then the kumquat liqueur, then the small kumquat, 3 drops of lemon, then place the measuring tape from the limoncello liqueur in the spray tank and spray on the surface 2 times, to make a rain drop effect in our cocktail :)


After consuming your cocktail, you can eat your spoon candy .. which will have absorbed alcohol so ...


Enjoy responsibly!!!!!

the photo is not mine, i got it from the internet, but i can't retrieve it to give the url referring to it, but it is so beautiful. Please if anyone see it help me add the referral url, thanks.

2019_Dimitra Papadopoulou

Τετάρτη 24 Ιουλίου 2019

Τηγανιτές πατάτες γαρνιρισμένες με μπάλες από παγωμένο τυρί φέτα-Fried potatoes garnished with frozen feta cheese


Θα χρειαστούμε (για δύο άτομα):                                        (in English, see below)
(Α)
1 γιαούρτι 2% στραγγιστό.
1 γιαούρτι 0% βελουτέ.

120 γρ φέτα.
1 κουταλιά σούπας γάλα εβαπορέ.
1 κουταλιά σούπας νερό.

(Β)
2 μερίδες καυτές τηγανιτές πατάτες (φρέσκες ή προτηγανισμένες)

Εκτέλεση:
(Α)
Ρίχνουμε όλα τα υλικά στο μίξερ και χτυπάμε πολύ καλά ώσπου να γίνουν σαν αφρόγαλα, μία ομοιόμορφη βελουτέ μάζα.
Τοποθετούμε στην κατάψυξη κι όταν παγώσει περίπου κατά το ήμισυ, δηλαδή μετά από 1-2 ώρες περίπου, χτυπάμε και πάλι καλά.
Ξαναβάζουμε στην κατάψυξη και περιμένουμε έως ότου παγώσει καλά, 1-2 ώρες ακόμη το πολύ.
Εάν παγώσει πολύ, το αφήνουμε λίγη ώρα εκτός ψυγείου για να μαλακώσει και να μπορούμε να το σερβίρουμε με scoop.

(Β)
Τοποθετούμε τις καυτές τηγανιτές πατάτες σε ένα πιάτο της αρεσκείας μας, με το scoop του παγωτού κάνουμε μια όμορφη μπάλα με την παγωμένη φέτα μας και την τοποθετούμε στην κορυφή και ομοίως κάνουμε μια δεύτερη όμορφη μπάλα παγωμένης φέτας και την τοποθετούμε ομοίως στην κορυφή από τις καυτές πατάτες, δίπλα στην πρώτη.

Καλή Όρεξη!!!


2019_Δήμητρα_Παπαδοπούλου
------------------------------------------------------------------------------------------------------------------------------

We will need (for two people):

(A)
1 yogurt 2% drained.
1 yogurt 0% velvet.
120 g of feta cheese.
1 tablespoon of evaporated milk.
1 tablespoon of water.

(B)
2 servings of hot fried potatoes (fresh or pre-cooked)


Implementation:

(A)
Pour all the ingredients into the mixer and beat very well until they become like a froth, a uniformly velvety mass.
Place it in the freezer and when it is frozen for about half, that is after about 1-2 hours, hit again well.
Replace it to the freezer and wait until it freezes well, 1-2 hours at most.
If it freezes too long, leave it for a while outside the freezer to soften it and to be able to serve it with a scoop.

(B)
Put the hot fried potatoes on a dish of your liking, with the scoop of ice cream make a beautiful ball of frozen feta cheese and place it on the top. Similarly make a second beautiful ball and place it similarly at the top of the hot potatoes , next to the first one.


Good appetite!!!


2019_Dimitra_Papadopoulou

Παρασκευή 12 Ιουλίου 2019

Τζιν με σάρκα από ροζ ή κόκκινο γκρέιπφρουτ και λικέρ εσπεριδοειδών. Οινούσσες by dim Vol.2-Gin with flesh of pink or red grapefruit and citrus liqueur. Oinousses by dim Vol.2

Θα χρειαστούμε (για 2 άτομα):


  • 2,5 μεζούρες τζιν ανά ποτήρι.
  • Την σάρκα από μισό ροζ ή κόκκινο γκρέιπφρουτ ανά ποτήρι.
  • 0,5 μεζούρα λικέρ εσπεριδοειδών , ή μισή μεζούρα κίτρινο Grand marnier ή μισή μεζούρα από οποιοδήποτε triple sec ανά ποτήρι.
  • Ροζ σόδα ή ροζ λεμονάδα (προαιρετικά).
  • 2 μακρόστενες φλούδες πορτοκαλιού για το γαρνίρισμα.


Εκτέλεση:

Καθαρίζουμε ένα ροζ ή κόκκινο γκρέιπφρουτ και αφαιρούμε προσεκτικά όλες τις εσωτερικές φλούδες. Το κάνουμε προσεκτικά ώστε να απομείνει όσο το δυνατόν περισσότερο ανέγγιχτη μόνο η σάρκα.
Χωρίζουμε σε 4 μέρη. Προσθέτουμε σε κάθε ένα από τα δυο ποτήρια το 1 / 4 και πιέζουμε πολύ ελαφρά με το γουδοχέρι ώστε να απελευθερωθούν λίγο οι χυμοί.
Προσθέτουμε σε κάθε ένα από τα δυο ποτήρια το υπόλοιπο 1 / 4 της σάρκας από το γκρέιπφρουτ.
Προσθέτουμε το τζιν και τέλος το λικέρ εσπεριδοειδών , η το grand marnier ή το triple sec της επιλογής μας.
Εάν επιθυμούμε
Για το γαρνίρισμα χρησιμοποιούμε από μια μακρόστενη φλούδα πορτοκαλιού την οποία έχουμε αφαιρέσει με το πίλερ αφού πρώτα έχουμε πλύνει καλά το πορτοκάλι με ζεστό νερό για να αφαιρέσουμε τυχόν κερί.

Καλή απόλαυση και καλό καλοκαίρι!!!

2019_Δήμητρα Παπαδοπούλου

We will need (for 2 people):


  • 2.5 scoops of gin per glass.


  • The flesh of half a pink or red grapefruit per glass


  • Half a scoop of citrus liqueurs, or half a scoop of yellow Grand Marnier or half a scoop of any triple sec per glass.


  • Pink soda or pink lemonade (optional).


  • 2 long orange peels for garnish.


Implementation:

We clean a pink or red grapefruit and carefully remove all the internal peels. We do so carefully so that only the flesh remains as untouched as possible.

We divide into 4 parts. Add to each of the two glasses 1/4 and press very lightly with the pestle to release the juices.

Add to each of the two glasses the remaining 1/4 of the flesh from the grapefruit.

Add the gin and finally the citrus liqueur, the grand marnier or the triple sec of our choice.

Optional pink soda or pink lemonade if we wish.

For the garnish we use a long orange peel which we have removed with the plier after having thoroughly washed the orange with warm water to remove any wax on its surface.

Have an amazing summer and njoy!!!!!

2019_Dimitra_Papadopoulou