Τετάρτη 20 Νοεμβρίου 2019

Ζυμαρικά Κανελόνια με κόκκινη σάλτσα τόνο - Tuna pasta Cannelloni

                                                                                       (In English see below)
Θα χρειαστούμε (για ένα μικρό ταψί 4 ατόμων): 
  • 2 συσκευασίες τόνου σε εξαιρετικό παρθένο ελαιόλαδο,
  • Μία συσκευασία κανελόνια που δεν χρειάζονται βράσιμο,
  • 4 μεγάλα καρότα,
  • 2 πιπεριές φλωρίνης,
  • 2 ξερά κόκκινα κρεμμύδια,
  • 5 γεμάτες κουταλιές της σούπας τοματοπελτέ διπλής συμπύκνωσης,
  • 2 κοφτές κουταλιές σούπας εξαιρετικό παρθένο ελαιόλαδο,
  • 1 κοφτή κουταλιά σούπας αλάτι,
  • 4 πρέζες πιπέρι,
  • 4 φλυτζάνια τσαγιού νερό.
Εκτέλεση:

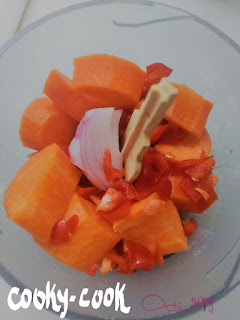
Πλένουμε, καθαρίζουμε και κόβουμε σε κομμάτια τα κρεμμύδια, τα καρότα και τις πιπεριές φλωρίνης.
Τα τοποθετούμε στο μπλέντερ και τα κόβουμε σε μικρά κομματάκια.
Σε κατσαρολάκι, βάζουμε το ελαιόλαδο να κάψει ελαφρώς, ρίχνουμε το μείγμα λαχανικών μας ώστε να μαγειρευτεί λίγο, προσθέτουμε το αλάτι, το πιπέρι, το νερό και αφήνουμε έως ότου εξατμιστούν τα 2/3 από τα υγρά. Προσθέτουμε τον τόνο, αφήνουμε το μείγμα να δέσει για πέντε λεπτά, αποσύρουμε από τη φωτιά και αφήνουμε να κρυώσει.

Λαδώνουμε καλά το μικρό ταψί.
Γεμίζουμε τα κανελόνια μας και τοποθετούμε το ένα δίπλα στο άλλο έως ότου γεμίσει όλο το σκεύος.
Προσθέτουμε στο σκεύος μισό φλυτζάνι τσαγιού νερού.
Το μείγμα σάλτσας με τόνο που έχει περισσέψει, το περιχύνουμε επάνω στα κανελόνια ώστε να καλυφτούν καλά.
Σκεπάζουμε με αλουμινόχαρτο και ψήνουμε στο φούρνο, στους 200 οC πάνω κάτω, για 35 λεπτπά της ώρας.
Εάν δεν έχουν εξατμιστεί επαρκώς τα υγρά, αφήνουμε λίγο ακόμα.
Το φαγητό είναι έτοιμο για να σερβιριστεί και για τους λάτρεις της γλυκόξινης κουζίνας θα αποτελέσει μια ευχάριστη έκπληξη!

Ιστορία της ιδέας:
Κόκκινη σάλτσα με τόνο για ζυμαρικά, εμπνεύστηκα να κάνω από τον αδερφό μου. Εκείνος τη μαγειρεύει συχνά, εκείνος έκανε κάτι αλχημείες με καρότα μέσα τα οποία τα λτρεύω μέσα σε σάλτσες. Μια μέρα, στην προσπάθεια να θυμηθώ πώς την κάνει, κατέληξα σε αυτή την εκτέλεση, η οποία μου άρεσε πολύ και έκτοτε την υιοθέτησα!

Πάντα την συνοδεύω με μακαρόνια, φιογκάκια, βίδες, νο 6 κ.λ.π.

Όμως τώρα που πλησιάζουν τα Χριστούγεννα , σκέφτηκα ότι τα κανελόνια θα μπορούν να αποτελέσουν έτσι ένα πιο ας το πούμε γιορτινό κάπως στα μάτια μας πιάτο.

Να μας δώσουν περισσότερο την αίσθηση ότι τρώμε κάτι γιατί γιορτάζουμε, γιορτάζουμε τη συνεύρεση με την οικογένεια, με τους φίλους, με τον άνθρωπό μας, πλησιάζει η μεγάλη γιορτή των Χριστουγέννων κλπ. 

Δεν πρόκειται για μια μακαρονάδα που την κάνουμε στην καθημερινότητά μας.

Επιπλέον , αποτελεί μία πρόταση για τη νηστεία των Χριστουγέννων , η οποία περιλαμβάνει το ψάρι.

Με μία τέτοια αφορμή το πρωτομαγείρεψα για τον αδερφό μου, τη νύφη μου και την υπέροχη ανιψιά μου.

Έκανα το λάθος να μη βάλω πολύ μείγμα από επάνω με αποτέλεσμα να μείνουν σκληρά τα κανελόνια στην επάνω πλευρά τους. Γι'αυτό τονίζω να τα σκεπάσετε καλά με την σάλτσα πριν μπουν για ψήσιμο.

Καλή επιτυχία!

2019_Δήμητρα Παπαδοπούλου

------------------------------------------------------------------------------------------------------------
We will need (for a small 4-person pan):
  • 2 tuna packages in extra virgin olive oil,
  • One pack of cannellons that don't need to be boiled,
  • 4 big carrots,
  • 2 Florin peppers,
  • 2 dried red onions,
  • 5 tablespoons full of double compaction tomato sauce,
  • 2 tablespoons extra virgin olive oil,
  • 1 tablespoon of salt,
  • 4 pinch of pepper,
  • 4 cups of water.
Implementation:

Wash, clean and cut the onions, carrots and peppers.
Place them in the blender and cut into small pieces.
In a saucepan, put the olive oil, pour our vegetable mixture to cook a little, add salt, pepper, water and leave until 2/3 of the liquids have evaporated. Add the tuna, let the mixture simmer for five minutes, remove from the heat and allow to cool.

Oil the small pan well.
We fill our cannellons and place them next to each other until all the utensils are filled.
Add half a cup of water to the pot.
Pour over the tuna sauce over the cannelloni to cover it well.
Cover with foil and bake in the oven at 200 ° C for 35 minutes.
If the liquids are not sufficiently evaporated, leave a little more.
The food is ready to serve and for the lovers of sweet and sour cuisine it will be a pleasant surprise!

History of the idea:

I was inspired to make red pasta tuna sauce by my brother. He cooks it often, he made alchemy with carrots inside which I love in sauces. One day, trying to remember how he it, I ended up doing this, which I really liked, and I have since adopted it!

I always accompany it with spaghetti, bows, screws, no 6 etc.

But now that Christmas is approaching, I have thought that cannellons can be a more festive dish in our eyes.

To give us more of a sense that we are eating something because we are celebrating, celebrating gathering with family, with friends, with our companion, Christmas is approaching, etc.

This is not a pasta we make usually in our daily lives.

On such an occasion I cooked it for my brother, my bride and my wonderful niece.

I made the mistake of not putting too much mixture on top so the cannellons stayed hard on their top. So I emphasize that you cover them well with the sauce before baking.

Good apetite!

2019_Dimitra Papadopoulou


Τετάρτη 13 Νοεμβρίου 2019

Κέικ γεμιστό με σιμιγδαλένιο χαλβά και επικάλυψη γκανάς σοκολάτας-Cake stuffed with semolina halva and chocolate ganache coating!!!


(In english see below)

Τα Χριστούγεννα είναι μια χαρούμενη γιορτή κατά την οποία περνάμε περισσότερο χρόνο με τα παιδιά αλλά και γινόμαστε και οι ίδιοι ξανά παιδιά, είναι μια γιορτή γεμάτη με γλυκά και σήμερα θέλω να σας παρουσιάσω μια έμπνευση που είχα για τα φετινά Χριστούγεννα η οποία σίγουρα θα ξετρελάνει μικρούς και μεγάλους!!!
Πρόκειται για ένα κέικ διαφορετικό από τα υπόλοιπα, καθότι αποφάσισα να παντρέψω δυο παραδοσιακά αλλά διαφορετικά γλυκά σε ένα και να τα δέσω με μια ωραία επικάλυψη. Είτε λοιπόν είστε λάτρεις των κέικ, είτε λάτρεις των σιροπιαστών γλυκών είτε λάτρεις της σοκολάτας, ο cooky-cook αυτός συνδυασμός θα δώσει άλλη νότα στο Χριστουγεννιάτικο γλυκό σας!!! Αν πάλι έχετε αυτά τα τρία υλικά σπαστά στο σπίτι σας, μπορείτε να τα συνδυάσετε για να μη πάει τίποτε χαμένο!!!
Ας ξεκινήσουμε λοιπόν!!!
  
Θα χρειαστούμε:
Για το κέικ:

  • 500 γρ φαρίνα,
  • 250 γρ βούτυρο ή μαργαρίνη (1 και 1/2 φλιτζάνι τσαγιού),
  • 350 γρ ζάχαρη (2 φλιτζάνι τσαγιού),
  • 4 αβγά,
  • 250 ml γάλα (1 και 1/4 φλιτζάνι τσαγιού),
  • Ξύσμα πορτοκαλιού από ένα ακέρωτο πορτοκάλι.
Εκτέλεση
Σε μίξερ χτυπάμε το βούτυρο, ρίχνουμε τμηματικά τη ζάχαρη και ένα ένα τα αβγά.
Χτυπάμε έως ότου τα υλικά αποκτήσουν μια ομοιόμορφη υφή , περίπου 2-3 λεπτά.
Προσθέτουμε διαδοχικά τη φαρίνα με το γάλα και το ξύσμα  και ανακατεύουμε ελαφρά.

Βάζουμε το μείγμα σε βουτυρωμένη και αλευρωμένη φόρμα της αρεσκείας μας και ψήνουμε σε μέτριο (180οC-200oC) και προθερμασμένο φούρνο για 1 ώρα.

Αφήνουμε το κέικ να κρυώσει στη φόρμα για 10-15 λεπτά. Έπειτα το βάζουμε σε πιατέλα.

Θα χρειαστούμε:
Για το σιμιγδαλένιο χαλβά:
  • 1 φλιτζάνι τσαγιού ελαιόλαδο,
  • 1 φλιτζάνι τσαγιού ψιλό σιμιγδάλι,
  • 1 φλιτζάνι τσαγιού χονδρό σιμιγδάλι,
  • 2 φλιτζάνια τσαγιού ζάχαρη,
  • 4 φλιτζάνια τσαγιού νερό,
  • 2 ξυλάκια κανέλας και
  • φέτες πορτοκαλιού.
Εκτέλεση:
Σε ένα κατσαρολάκι βράζουμε το νερό με τη ζάχαρη προσθέτοντας τα ξυλάκια της κανέλας και τις φέτες πορτοκαλιού έως ότου διαλυθεί η ζάχαρη. Αφήνουμε στην άκρη.

Σε μια διαφορετική κατσαρόλα, ζεσταίνουμε το ελαιόλαδο σε μέτρια φωτιά και καβουρδίζουμε το σιμιγδάλι , ανακατεύοντας με μία ξύλινη κουτάλα, μέχρι να ροδίσει (περίπου 6-7 λεπτά). Προαιρετικά και για όποιον το επιθυμεί, μπορούν να προστεθούν ξηροί καρποί, ή αποξηραμένα φρούτα ή ό, τι άλλο.

Αποσύρουμε από τη φωτιά και ρίχνουμε με πολλή προσοχή, για να μη πεταχτεί και καούμε, το ζεστό σιρόπι. Και όσο το σιμιγδάλι το απορροφάει, προσθέτουμε με προσοχή κι άλλο.

Ξαναβάζουμε το χαλβά στη φωτιά και ανακατεύουμε. Αποσύρουμε από τη φωτιά και αφήνουμε το σκεύος στην άκρη.

Κόβουμε με ένα μεγάλο κομμάτι σπάγκο το κέικ κατά μήκος και περίπου στη μέση, τοποθετούμε το κάτω τμήμα μέσα στην φόρμα όπου το ψήσαμε αρχικά, προσθέτουμε ένα στρώμα από το σιμιγδαλένιο χαλβά μας, πάχους περίπου 2-3 δαχτύλων, τοποθετούμε από επάνω το επάνω μέρος από το κέικ μας.

Θα χρειαστούμε:
Για τη γκανάς σοκολάτας:
  • 2 κουβερτούρες υγείας
  • 1 κρέμα γάλακτος.
Εκτέλεση
Κόβουμε με προσοχή τη σοκολάτα σε πολύ μικρά κομματάκια και τα ρίχνουμε σε ένα σκεύος.
Σε ένα κατσαρολάκι ζεσταίνουμε την κρέμα γάλακτος και όταν ζεσταθεί αρκετά (λίγο πριν βράσει) την ρίχνουμε στο σκεύος με τα κομματάκια σοκολάτας, περιμένουμε ένα λεπτό και ανακατεύουμε με μια σπάτουλα σιλικόνης απλά και σταθερά για να μην μπει αέρας στο μείγμα. Δεν θέλουμε να βράσει η κρέμα γάλακτος γιατί σε αυτή την περίπτωση θα κάψει τη σοκολάτα.

Αφήνουμε την γκανάς μας να κρυώσει ελαφρώς για να μην φεύγει από το κέικ αλλά όχι πολύ γιατί δεν θα απλώνετε σωστά πάνω στο κέικ μας.

Απλώνουμε επάνω στο κέικ ώστε να το καλύψει επαρκώς, αφήνουμε να κρυώσει καλά και βγάζουμε από την φόρμα μας!

Το γεμιστό κέικ μας με σιμιγδαλένιο χαλβά είναι έτοιμο και ετοιμαστείτε για τα πιο γευστικά και παιχνιδιάρικα Χριστούγεννα.

ΝΗΣΤΕΙΑ-ΧΟΡΤΟΦΑΓΙΑ
Tips: Εάν νηστεύετε ή αν είσαστε χορτοφάγοι ή vegan, μπορείτε να φτιάξετε την συνταγή για φανουρόπιτα ή τη συνταγή για νηστίσιμο σοκολατένιο κέικ κι αντί για γκανάς σοκολάτας να λιώσετε σε μπεν μαρί σκέτη την κουβερτούρα.

Στολίστε αν θέλετε το κέικ με οδοντογλυφίδες χριστουγεννιάτικα δέντρα για ένα πιο χαρούμενο και χριστουγεννιάτικο αποτέλεσμα, σαν μικρό χαρούμενο δάσος επάνω στο τραπέζι σας!!!

Ευτυχισμένα Χριστούγεννα και Ευτυχισμένα με cooky-cook Χριστούγεννα!!!!

------------------------------------------------------------------------------------------------------------------
Christmas is a happy holiday where we spend more time with the kids but we also become kids again, it's a holiday full of sweets and today I want to present to you an inspiration I had for this year's Christmas that will surely delight children and adults !!!

This is a cake different from the others, as I decided to marry two traditional but different sweets into one and tie them in a nice overlay. So whether you are a cake lover, a syrupy sweetie or a chocolate lover, this cooky-cook combination will give your Christmas sweet another touch and taste!!! If you still have these three materials separated in your home, you can combine them so that nothing is lost !!!

So let's get started !!!

We will need:

For the cake:

500 g of flour,

250 g butter or margarine (1 and 1/2 cup of tea),

350 g sugar (2 cups of tea),

4 eggs,

250 ml of milk (1 and 1/4 cup of tea),

Orange shavings from a ripe orange.

Implementation

In a mixer beat the butter, sprinkle sugar and eggs one by one.

Beat until the materials have a uniform texture, about 2-3 minutes.

Add the flour with the milk and orange shavings, and stir gently.


Put the mixture in the buttered and floured form of our choice and bake in medium (180oC-200oC) and preheated oven for 1 hour.

Allow the cake to cool in the mold for 10-15 minutes. Then put it on a platter.


We will need:
For semolina halva:

1 cup olive oil tea,

1 cup fine semolina,

1 cup thick semolina,

2 cups of sugar,

4 cups water,

2 cinnamon sticks and

slices of orange.

Implementation:
In a saucepan, boil the water with the sugar, adding the cinnamon sticks and orange slices until the sugar dissolves. Leave aside.

In a different saucepan, heat the olive oil over medium heat and roast the semolina, stirring with a wooden spoon, until it turns golden brown (about 6-7 minutes). Optionally and for anyone who wishes, nuts, or dried fruits or whatever can be added.

Remove from the heat and pour with care, so as not to throw and burn, the hot syrup. And as the semolina absorbs it, add more carefully.

Return the semolina halva to the heat and stir. Remove from the heat and leave the pan aside.

Cut with a large piece of twine the cake along the middle and about halfway, place the bottom into the mold where we first baked it, add a layer of semolina halva, about 2-3 fingers thick, place the top of the cake on top of it.

We will need:
For chocolate ganache:

2 chocolate couvertures

1 whipping cream.

Implementation

Carefully cut the chocolate into small pieces and pour into a bowl.

In a saucepan heat the whipping cream and when it is warm enough (just before boiling) pour it into the chocolate, wait a minute and mix with a silicone spatula simply and firmly to prevent air from mixing. We do not want the cream to boil because in this case it will burn the chocolate.

Allow our ganache to cool slightly so that it does not leave the cake but not too much because it will not spread properly on our cake.

Spread over the cake to cover it well, allow to cool and remove from the mold!

Our stuffed with semolina halva cake is ready and get ready for the most delicious and playful Christmas.


FASTING-VEGETERIANS-VEGANS
Tips: If you are fasting or you are a vegeterian or vegan, you can make the recipe for lantern pie or the recipe for vegan chocolate cake and instead of chocolate ganache simply melt the chocolates in a bain-marie.

Decorate if you like the cake with toothpicks with chrismas trees for a more cheerful and Christmas-like look, like a little cheerful forest on your table !!!

Merry Christmas and Merry cooky-cook Christmas!!!!!


Σάββατο 9 Νοεμβρίου 2019

Κορμός μωσαϊκό MINNIE MOUSE με ροζ κομματάκια σοκολάτας και γέμιση πραλίνας μπουένο-MINNIE MOUSE trunk (kormos-mosaic) with pink chocolate chips and praline bueno stuffing!!!

(In English see below),
Την συνταγή την εμπνεύστηκα για τα γενέθλια της ανιψιάς, μου και της την αφιερώνω με όλη μου την αγάπη!!! 
Θα χρειαστούμε:

Για έναν μέτριο προς μεγάλο κορμό μωσαϊκό

  • 1 και 1/2 συσκευασία μπισκότα πτι μπερ,
  • 200 γρ. μαργαρίνη,
  • 3 κουταλιές σούπας κακάο,
  • 2/3 φλυτζάνας τσαγιού άχνη ζάχαρη,
  • 1 φλυτζάνα τσαγιού γάλα συμπυκνωμένο (όπως είναι από το κουτί),
  • 3 συσκευασίες rubby kit-kat (τα ροζ),
  • 3 κουταλιές σούπας πραλίνα bueno.
Για την διακόσμηση
  • Μία συσκευασία κόκκινης ζαχαρόπαστας (όπως πωλείται έτοιμη),
  • Μία κουβερτούρα υγείας.
Εκτέλεση:
Θα χρειαστούμε στη φάση αυτή την πρώτη συσκευασία των μπισκότων πτι μπερ. Τα κόβουμε σε επιφάνεια κοπής με μεγάλο μαχαίρι σε κατά το δυνατόν ομοιόμορφα και όχι πολύ μεγάλα κομμάτια.
Λιώνουμε τα 200 γρ. μαργαρίνη και τα τοποθετούμε σε ένα μεγάλο μπολ.
Προσθέτουμε το κακάο, την άχνη ζάχαρη και το συμπυκνωμένο γάλα.
Ανακατεύουμε πολύ καλά το μείγμα με σύρμα (αβγοδάρτη).
Εφόσον όλα τα υλικά έχουν αναμειχθεί καλά, προσθέτουμε τα σπασμένα πτι μπερ και ανακατεύουμε καλά ώστε να βραχούν και το μείγμα να σφίξει.
Το αφήνουμε στην άκρη όση ώρα θα κόψουμε τα rubby kit-kat σε ομοιόμορφα μικρά κομματάκια (πάλι με το μεγάλο μαχαίρι μας προσεκτικά, σε επιφάνεια κοπής).
Τα προσθέτουμε στο μείγμα μας και ανακατεύουμε καλά.
Απλώνουμε σε μεγάλη ίσια επιφάνεια μια λαδόκολλα και απλώνουμε το μείγμα σε ένα μεγάλο ορθογώνιο σχήμα και σχετικά λεπτό σε πάχος.

Για την εσωτερική γέμιση, θα χρειαστεί σε multi μπλέντερ να θρυμματίσουμε τη μισή συσκευασία από τα μπισκότα πτι μπερ, η οποία μας έχει απομείνει.
Αναμιγνύουμε με τις τρεις κουταλιές σούπας πραλίνας bueno ώσπου να γίνει μια ομοιογενής πάστα.
Πλάθουμε ένα μακρόστενο "μπαστούνι" και το τοποθετούμε κατά μήκος και στη μέση του προηγούμενου μείγματος μας, το οποίο απλώσαμε στην λαδόκολλα.

Τυλίγουμε και κλείνουμε τον κορμό μας με τρόπο που η πραλίνα bueno να μείνει στο κέντρο, τυλίγουμε καλά με τη λαδόκολλα και τοποθετούμε στην κατάψυξη.

Για να διακοσμήσουμε τον κορμό μας θα φτιάξουμε κόκκινα τρισδιάστατα φιογκάκια με την χρήση της ζαχαρόπαστάς μας, και στρόγγυλα αυτάκια με τη χρήση της κουβερτούρας μας.

 Ξεκινώντας με τα φιογκάκια μας, κόβουμε τη ζαχαρόπαστα κατά πλάτος σε 17 μακρόστενες λωρίδες. Την κάθε μία την κόβουμε σε δύο μεγαλύτερα κι ένα μικρότερο μέρος. Πλάθουμε τρεις μπαλίτσες. Στις δυο μεγαλύτερες δίνουμε σχήμα καρδιάς, την μικρότερη την πατάμε ελαφρώς στο κέντρο για να γίνει πεπλατυσμένη. 
Ενώνουμε τα τρία τμήματα με τρόπο ώστε η μικρή πεπλατυσμένη μπίλια να είναι στο κέντρο και οι δυο καρδούλες δεξιά κι αριστερά. Με τον τρόπο αυτό δημιουργείται ένα φιογκάκι. Δημιουργούμε 17 και τα τοποθετούμε σε ένα πιάτο στο ψυγείο, χωρίς να ακουμπάνε το ένα το άλλο.

Συνεχίζουμε με τα αυτάκια. Σε μπεν μαρί λιώνουμε την κουβερτούρα μας και την απλώνουμε σε λαδόκολλα ομοιόμορφα και σε σχετικά λεπτό στρώμα. Αφήνουμε να κρυώσει και να στερεοποιηθεί σχετικά και με ένα καπάκι από μπουκάλι νερού , το οποίο χρησιμοποιούμε ως κουπ-πατ, κόβουμε 34 κυκλάκια στην επιφάνεια. Τοποθετούμε για πέντε λεπτά στο ψυγείο κι έπειτα με μεγαλύτερη πλέον ευκολία διαχωρίζουμε και ξεκολλάμε τα σοκολατένια κυκλάκια μας. Τα τοποθετούμε σε ένα πιάτο στο ψυγείο, χωρίς να ακουμπάνε το ένα το άλλο.

Την επόμενη μέρα κι όταν ο κορμός έχει παγώσει καλά, τον κόβουμε σε 17 ομοιόμορφες φέτες και στολίζουμε τοποθετώντας από ένα κόκκινο φιογκάκι στην κορυφή και στο κέντρο της καθεμιάς, κι από δυο στρόγγυλα αυτάκια δεξιά κι αριστερά τα οποία στηρίζουμε ανάμεσα σε δυο φέτες. 
Στολίζουμε με τον ίδιο τρόπο κατά μήκος όλες τις φέτες και ο κορμός μας Minnie Mouse είναι έτοιμος!!!


Προσαρμόστε ανάλογα το σχέδιο για διαφορετικές θεματικές!!!

-------------------------------------------------------------------------------------------------------------------
I was inspired the recipe for my niece's birthday, and I dedicate it to her with all my love!!!

We will need:

For a medium to large trunk ( kormos-mosaic in greek)

1 and 1/2 pack of biscuits type petit - beurre,
200 g margarine,
3 tablespoons cocoa,
2/3 teaspoon powdered sugar,
1 teaspoon concentrated milk (as in the box),
3 packs of rubby kit-kat (pink),
3 tablespoons of praline bueno.

For decoration
One packet of red pastry,
Chocolate couverture.

Implementation:

In this phase we will need the first package of biscuits. Cut them on a cutting surface with a large knife in as uniform as possible and not too large pieces.

Melt 200 g. margarine and place in a large bowl.

Add the cocoa, powdered sugar and concentrated milk.

Mix thoroughly with wire whisk.

Once all the ingredients have blended well, add the broken biscuits and mix well.

Leave it aside for as long as we cut the rubby kit-kat into evenly small pieces (again with our large knife carefully, on a cutting surface).

Add them to our mixture and mix well.

Spread graseproof paper on a large straight surface and spread the mixture into a large rectangular shape in a relatively thin layer.

In the next phase, for the internal filling, we will need to crumble half of the leftover biscuits in a multi - blender.

Mix with the three tablespoons of bueno praline soup until it becomes a homogeneous paste.

Place it along the middle of the previous mixture.

Wrap and close the trunk so that the bueno praline stays in the center, wrap well with the graseproof paper and place in the freezer.

To decorate our trunk we will make red coloured, three-dimensional bows with the use of our pastry, and minnie ears with our chocolate couverture.

Starting with our bows, we cut the red pastry across into 17 long strips. Cut each one into two larger portions and one smaller. In the two bigger ones we give the shape of a heart, the smaller one , we slightly press in the center so that it becomes flattened.

We unite the three sections so that the small flattened ball is in the center and the two hearts are right and left. This creates a bow. We create 17 and place them on a plate in the fridge, without touching each other.

We continue with the minnie mouse ears. In a bain-marie we melt our chocolate couverture and spread it evenly on a graseproof paper and in a relatively thin layer. Leave it to cool and solidify and with a water bottle lid, which we use as a cuter, we cut 34 circles on the surface. Put in the refrigerator for five minutes and then more easily separate and peel off our chocolate chips. Place them on a plate in the fridge, without touching each other.

The next day and when the trunk is well frozen, we cut it into 17 even slices and decorate each slice by placing a red bow at the top and center of each, and two round chocolate couverture chips right and left which we support between two slices.

We decorate in the same way along all the slices and our Minnie Mouse trunk is ready !!!

Customize the design accordingly for different themes !!!

----------------------------------------------------------------------------------------------------------------------
TRANSFORM IN BRAILLE
Text of the recipie to transform in Braille (Choose either Czech1-English (UK)1 - English (US)1 - French Grade1and Unified Braille Code 1) via https://www.brailletranslator.org/  download it in .brf ASCII file and be able to print it in a suitable printer:

cookycook
minnie mouse trunk kormos greek sweet with pink chocolate chips and praline bueno stuffing
one and half pack of biscuits type petit beurre
two hundred gr margarine
three tablespoons cocoa
half glass of powdered sugar
one glass of concentrated milk
three packs of rubby kit kat
three tablespoons of praline bueno
for decoration
one packet of red pastry
chocolate couverture

implementation
in this phase we will need the first package of biscuits
cut them on a cutting surface with a large knife in as uniform as possible and not too large pieces
melt two hundred gr margarine and place in a large bowl
add the cocoa powdered sugar and concentrated milk
mix thoroughly with wire whisk
once all the ingredients have blended well add the broken biscuits and mix well
leave it aside for as long as we cut the rubby kit kat into evenly small pieces again with our large knife carefully on a cutting surface
add them to our mixture and mix well
spread graseproof paper on a large straight surface and spread the mixture into a large rectangular shape in a relatively thin layer
in the next phase for the internal filling we will need to crumble half of the leftover biscuits in a multi blender
mix with the three tablespoons of bueno praline soup until it becomes a homogeneous paste
place it along the middle of the previous mixture
wrap and close the trunk so that the bueno praline stays in the center wrap well with the graseproof paper and place in the freezer

to decorate our trunk we will make red coloured three dimensional bows with the use of our pastry and minnie ears with our chocolate couverture
starting with our bows, we cut the red pastry across into seventeen long strips
cut each one into two larger portions and one smaller
in the two bigger ones we give the shape of a heart the smaller one we slightly press in the center so that it becomes flattened.
we unite the three sections so that the small flattened ball is in the center and the two hearts are right and left
this creates a bow
we create seventeen and place them on a plate in the fridge without touching each other
we continue with the minnie mouse ears
in a bain marie we melt our chocolate couverture and spread it evenly on a graseproof paper and in a relatively thin layer
leave it to cool and solidify and with a water bottle lid which we use as a cuter we cut thirtyfour circles on the surface

put in the refrigerator for five minutes and then more easily separate and peel off our chocolate chips
place them on a plate in the fridge without touching each other
the next day and when the trunk is well frozen we cut it into seventeen slices and decorate each slice by placing a red bow at the top and center of each and two round chocolate couverture chips right and left which we support between two slices
we decorate in the same way along all the slices and our Minnie Mouse trunk is ready
customize the design accordingly for different themes